


wingless
-
Posts
710 -
Joined
-
Last visited
-
Days Won
73
Content Type
Profiles
Forums
Events
Posts posted by wingless
-
-
-
Drove the 911 round trip from southern Florida to near Dallas to watch the eclipse, meeting and staying w/ my brother and his wife in their amazing camper after they drove in from Virginia.
The eclipse weather forecast was not great. The actual weather was on and off clouds when the eclipse was starting, but became 100% clear throughout totality.
Can totally understand why people chase eclipses. That was an amazing experience.
There was a 911 parking lot repair to fix an issue that arose on the way to Dallas. During that repair I discovered that I needed to borrow a 5mm long arm Allen wrench from my bother to augment my on board tool set.
This carried tool deficiency needed to be resolved so I searched for my options.
In the end I decided to get a long arm Allen wrench tool set, instead of just that single 5mm wrench.
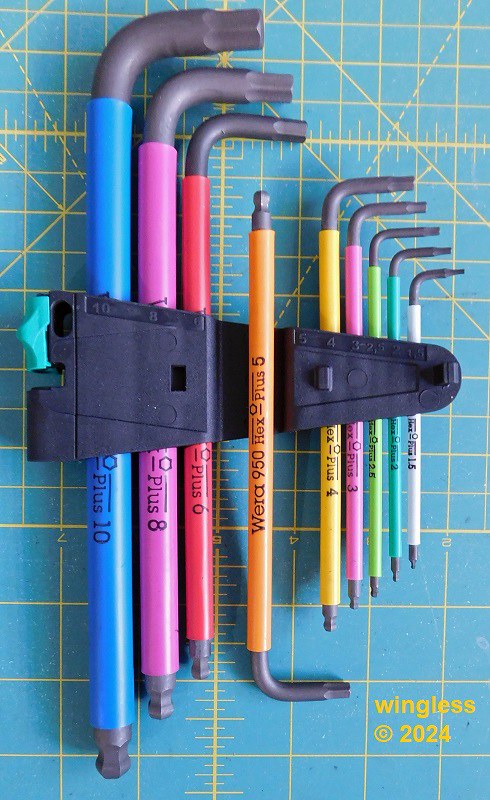
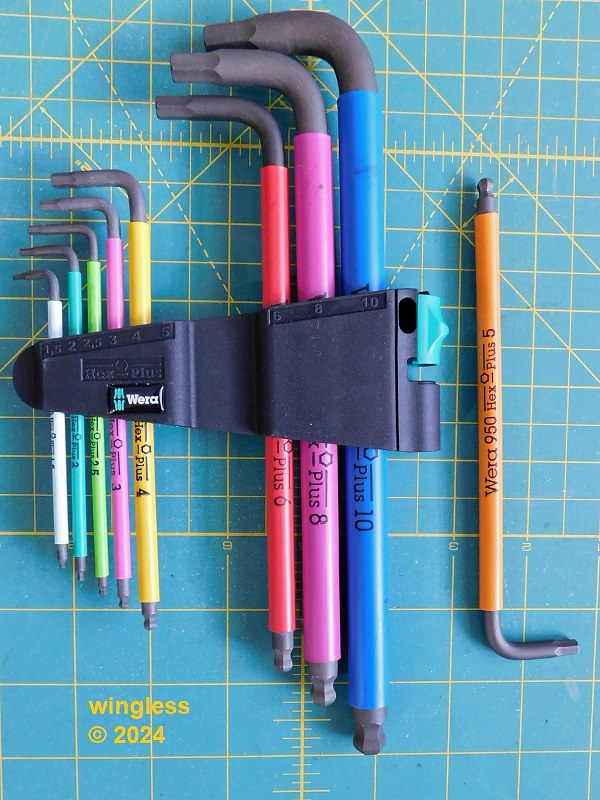
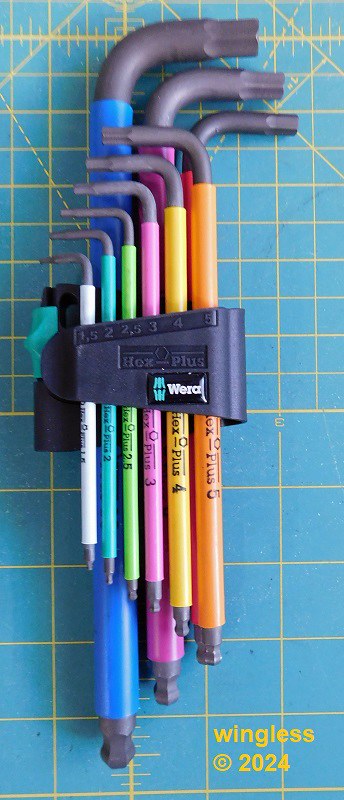
To that end I selected this Wera 950/9 9-Piece Long-Arm Ball-End Metric Allen Wrench Set.
This is a very nice set, having a long colored sleeve w/ clear black printing on two sides, rotationally oriented, identifying the tool. The color coding follows their size / color standard. The tool holder is hinged w/ a sliding thumb latch. The tool holder folds open to lay all the wrenches out in a row.
The tools included are: 1.5mm; 2mm; 2.5mm; 3mm; 4mm; 5mm; 6mm; 8mm and 10mm.
These tools have their Hex Plus ends, designed to prevent damage to the fastener receptacle. The packaging hex cross section image looks like scallop instead of flat sides.
These tools have been used and I am very happy w/ this set.


-
Whenever I manipulate images prior to posting in a forum, one of the steps is usage of the Windows Paint program, then Resize the JPG image so the larger pixel dimension is 800. IMO, that size works perfect for forum posting. (Can't help on chair part...)
-
 1
1
-
-
4 hours ago, Altan said:
The purpose is to use the dies with a power tool, specifically with a impact driver or a drill with a hex shank adapter or chuck and not manually. Basically you attach the dies in this die holder and secure it with the grub screw and use it with impact driver to make threads on a metal bar.

Thanks.
My preference has always been by hand, w/ a back and forth motion.
-
Sorry for my ignorance, what is the purpose / use of this tool?
-
There is now also a small headband rechargeable LED lamp (Christmas present), w/ appropriate USB charging cord, that will plug into my new twin USB surface mount receptacle and a small three AAA battery hand held flashlight, that are carried w/ the tools.
-
1
-
-
4 hours ago, Altan said:
These Wiha tools were made in Germany till a few years ago. Now, I think they make them in Vietnam (?). Why not in a Eastern European country instead of Vietnam, China or Taiwan?! Knipex and NWS ones are still made in Germany.
100% correct, the Wiha tools are designed in Germany, manufactured in Vietnam.
Both Knipex and NWS look like fine tools, thanks, maybe for my next car that I also don't need...
-
44 minutes ago, Eric - TIA said:
Never used Wiha. They look nice.
Me too. I agree. I wanted / needed something beyond fingertips to carry around for grabbing something to maintain Pakled motion when / if required.
-
On 3/13/2024 at 9:47 AM, Eric - TIA said:
You have some cool tool kits with these cars you have.
"FINALLY figured out how to properly shift up / down w/ a non-synchronized transmission." I am still working on this
Those Wera tools are awesome.
Thanks much.
The method I use is to double clutch during upshift, clutch in, shift first to neutral, clutch out, clutch in, neutral to second, works fine every time.
For downshift, when I press the clutch, as I shift from fourth through neutral I blip the gas and smash it into third. Also works every time w/ a clunk. Without the gas blip it will be impossible to select a lower gear until the vehicle is stopped, w/ total gear grinding.
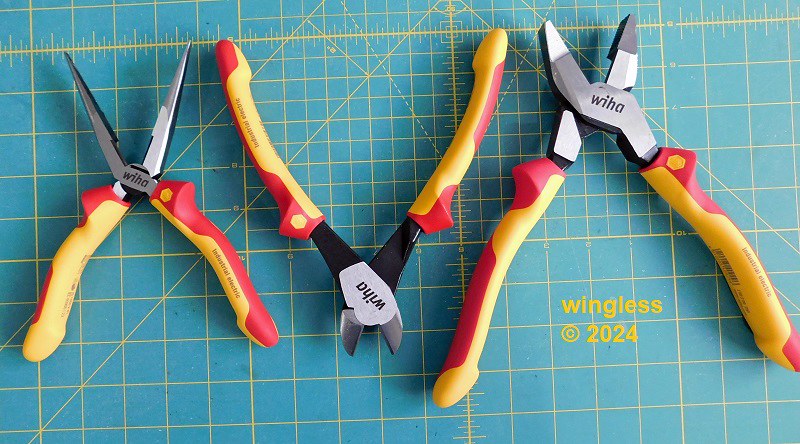
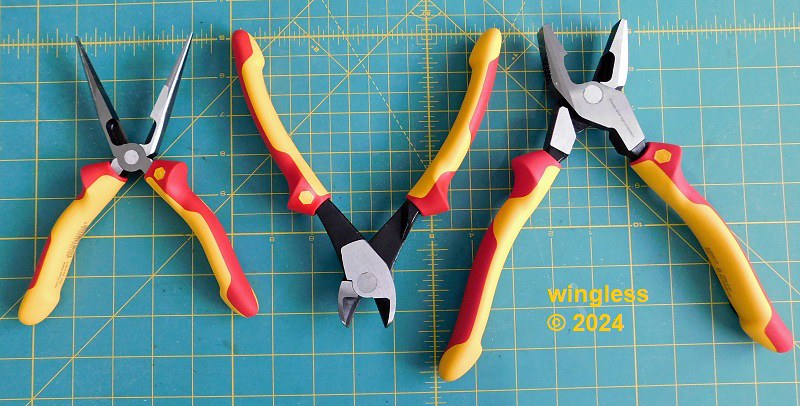
Just added this Wiha 32967 Three Piece Pliers Set to the Fiat tool arsenal.
This has a: 8" needle nose pliers; a 8" wire cutter and a 9½" Lineman's pliers.
These have the Wiha 12 month no hassle guarantee. They have 1,000V insulation safety rating.
These appear to have very nice construction.


-
1
-
-
You might get a ballpark date range by looking through the old Sears Craftsman catalogs.
-
Loving my new-to-me 1968 Fiat 500L. This is SUCH A FUN car to drive.
FINALLY figured out how to properly shift up / down w/ a non-synchronized transmission.
The Fiat included a mostly-complete OEM tool kit. I was able to locate / purchase the missing 8mmx10mm socket tee wrench, now my OEM kit is complete.
That OEM Fiat tool kit includes these parts: a molded / hinged plastic case, w/ dedicated pockets to all the tools; that previously identified 8mmx19mm socket tee wrench; a pair of open end wrenches, one 8mm / 10mm, the other 13mm / 17mm; a thick awl bit, fits into the screwdriver handle; a wheel lug bolt / hubcap nut lug wrench; a spark plug socket w/ a pair of cross driver holes and a screwdriver w/ a removable bit.
Note that cute / short lug bolt wrench is waaay more than enough to remove / replace the lug bolts, properly tightened to the 32.5 ft-lbs to 39.8 ft-lbs specified torque. BTW, the drum brake face includes a small stud, perfect for usage to hang the teeny wheels during replacement.


The vehicle also incudes the OEM jack, w/ a vertical screw crank for raising / lowering and a small driven side arm that fits into a small body pocket, in the rocker panel under the door strikes, permitting raising / lowering one side at a time.

The vehicle retains all this front trunk stuff w/ a small / stretched / clipped rubber strap.
To this OEM stuff I added a bunch of stuff.
One is the waaay cool old rocker adjustment wrench. The engine has solid tappets that require periodic adjustment of the gap. I initially used a set of small wrenches to turn the adjustment screw, then hold while tightening the locking nut. I found / purchased this old two piece tappet wrench set on eBay from a seller in Italy. It has the required 11mm nut socket, a flat blade for rotating the adjustment screw, w/ both having a tee handle on the top. It is sooo nice having exactly the correct tool for the job! (Sucks for purchase cost and shipping cost, but I'm still happy.)


Another essential tool is the printed English Factory Service Manual (FSM). The FSM is complete and permits proper diagnostics / repair / servicing the vehicle. I also like the spiral binding, permitting laying flat open on any page.


Additional stuff is selected based on small size / weight and utility. It would be sooo easy to overload the vehicle w/ extra "essentials". Note that the tires have tubes, so a tire plug kit would be useless. To that end, the intact small spare tire is the best option to resume Pakled motion.
These are the other items that are carried to maintain motion.
Spare quarts of PennGrade 1 20W-50 motor oil. Bottle of Motor Medic Lead Substitute additive, one bottle treats four 5 gallon refills. Warning triangle. Red eBay first aid kit, note I've already used this kit after stupid repair operations. The Element E50 fire extinguisher. Empty one gallon gas tank.
Other tools are a feeler gauge set and this waaay cool Wera 6002 Joker 10mm / 13mm combination open end wrench. The second one is for my Porsche 911.


Another tool set carried in both the Fial 500L and Porsche 911 is this very nice Wera 056490 tool set.

-
Welcome to the forum.
Using eBay for a specific old tool search like this should have good results.
Here is my search that could be refined if the desired tool isn't located.
There are many model numbers showing up that meet the description. Just select the desired model number.
-
Welcome to the forum.
Those look like combination wood spade drills, for flat head screws, to bore below the surface, that would then be filled w/ a wood plug for a hidden fastener.
-
Was popping around in it this past weekend.
It is sooo different driving a vehicle w/o a synchronized transmission. It is always examining traffic to limit shifting.
The upshifts are "easy" w/o any gear clashing, using double clutching, step on clutch, shift to neutral, release clutch, step on clutch, shift to next gear.
The downshifts work by "blipping" the throttle after mashing the clutch, then clunking it into the next lower gear. Otherwise it totally grinds and impossible to get into gear until stopped.
Starting vehicle also interesting: transmission to neutral; dash key switch clockwise; lift choke lever (between seats) for cold start; lift start lever to crank, then gradually lower choke lever.
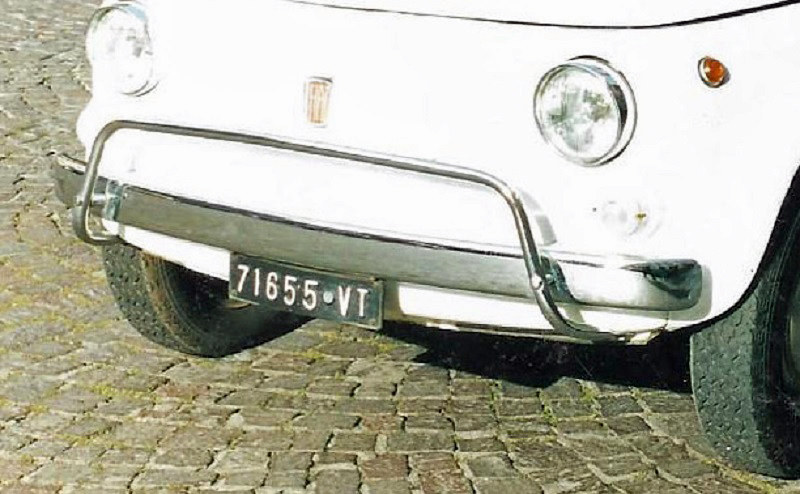
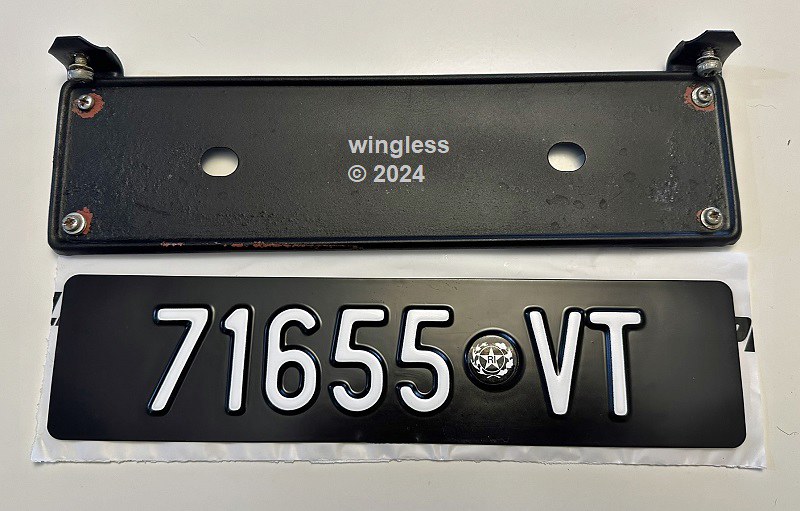
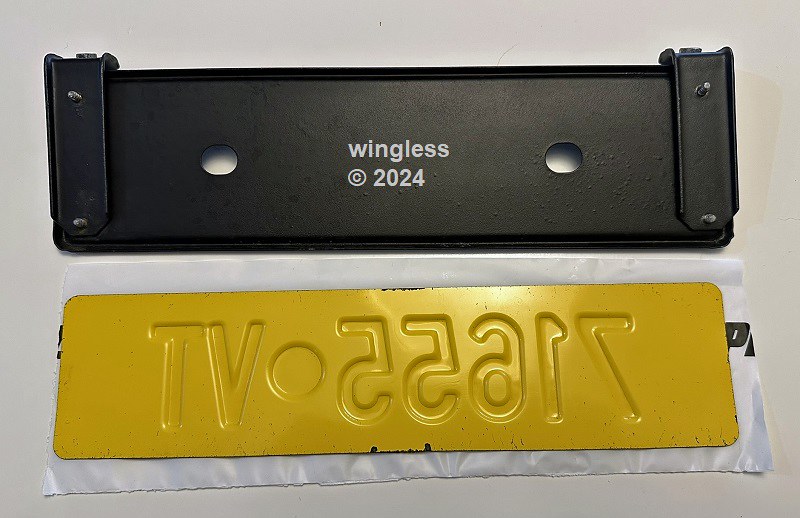
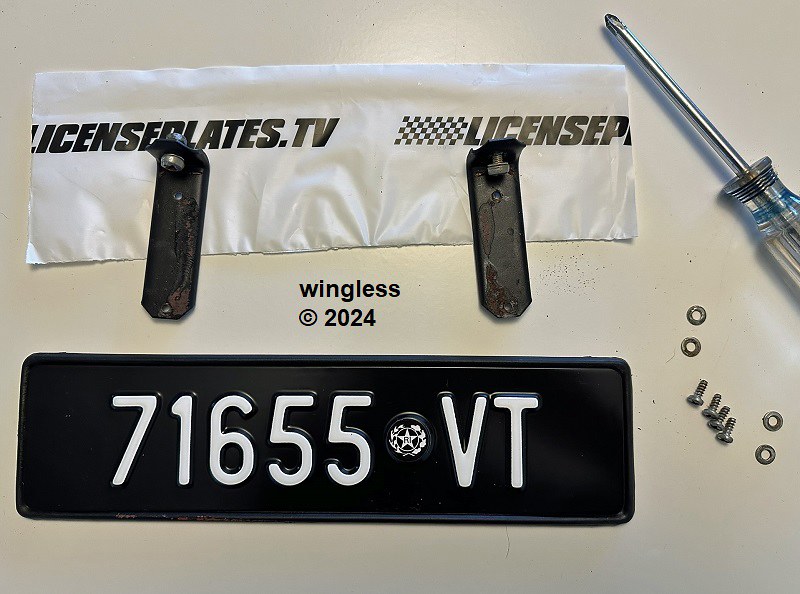
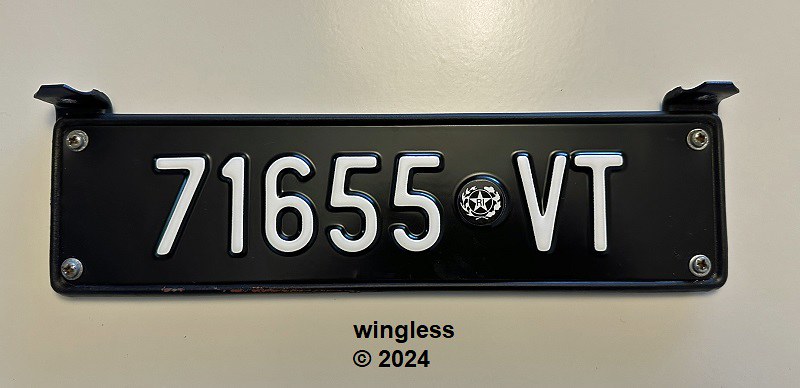
The vehicle was in Italy until recently. It included a "passport" w/ a front photo, showing it's small Italian embossed letters black background white letters front license plate, w/ "VT" showing it comes from the Province of Viterbo and also included the registration booklet, w/ a sticker and stamp for each registration year, also showing that 71655-VT registration.
That original vacuum formed front plastic plate was gone, but that small front plate bracket was still attached to the vehicle.
The Licenseplates.TV company creates replica license plates, using imported Italian aluminum plate blanks, including this 1932 to 1976 Italy mini Euro embossed front license plate. This was ordered and arrived in less than a week. They use a decal for the Italian Republic emblem, instead of the original printed symbol.
The small front plate bracket was unbolted from the bumper, the corner tapping screws removed, holes drilled in the plate corners, plate screwed to bracket and bracket bolted back onto bumper. The result is exactly what I hoped.


-
1
-
-
Thanks for the images, very helpful.
Here is the specification for that switch.
My suggestion is to disassemble that switch to clean the interior and hopefully restore normal operation, like I did on my similar but different switch. Mine was also made of unobtainium. It now again has normal operation.
When I disassemble something like that switch, I carefully use a loose utility knife blade(s) as the catch pry tool, to release the catches.
-
1
-
-
Welcome to the forum.
Why not share an image of the desired part?
-
My VERY BEST workbench was one I constructed for work.
The top was genuine butcher block and the base was four steel four drawer cabinets, each filled w/ labeled compartment bins of metal hardware, like screws and nuts.
That thing was sooo solid!
-
1
-
-
It REALLY SUCKS when a company demonstrates abject disdain for their customers.
Whenever that happens w/ me I endeavor to enlighten the offender to the errors of their ways.
On a related vein, when someone who isn't part of our community joins solely to "drop a grenade" then move on, I have a shaker full of grains of salt that I take first before consuming that bait, hook line and sinker.
OP, best of luck on your travails.
-
1
-
-
Welcome to the forum.
There are US vendors selling that Cutech 20200 model wear plate like this one.
If they won't ship to Canada, then maybe time to relocate to the USA?
-
2 hours ago, sawihel said:
Hello. I have a roof valley that leaks quite badly and would love some advice on fixing this as I plan to have a go myself. Where is the water likely to be coming from and will it help if I replacve the felt underneath on that section. Any advice would be most grateful. Thanks
Welcome to the forum.
My info is at a homeowner level, NOT a roofer.
IMO any / all repairs should be done according to applicable standards and procedures.
As you know the felt is the first layer, so replacing that requires removing all the layers above, extending past the problem area, to maintain proper water shedding.
Also it is likely that the plywood decking in the problem area has been damaged from the leaking, requiring replacement, also extending the area that must be stripped bare.
Additionally, many roofs exist at a high elevation and many are steep, making safety, proper equipment and proper procedures essential. Please DO NOT attempt this repair unless the safety component is completely addressed!
-
On 1/20/2024 at 7:03 AM, wingless said:
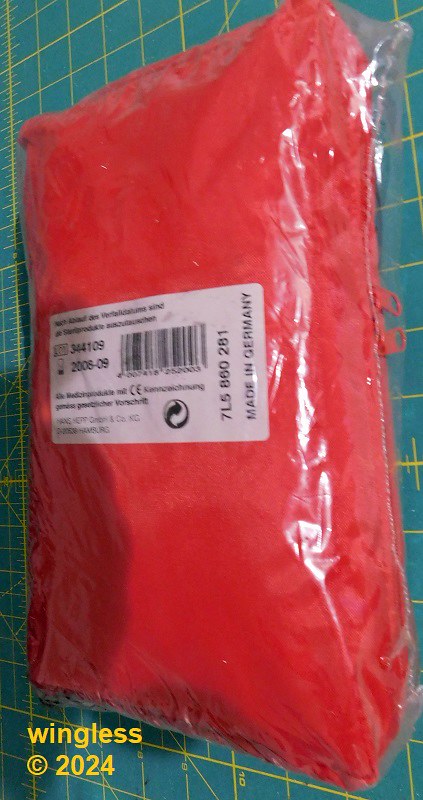
My 2004 Porsche Cayenne Turbo included a first aid kit, Porsche part number 7L5 860 281, made by HANS HEPP Gmbh & Co., in a heat sealed cellophane wrapper. That kit was retained after the vehicle was sold and now resides in my 2022 Porsche Macan.
There is no idea what is contained within the kit, as I haven't broken the factory sealed cellophane.
Of interest / concern, the manufacturer marked the label w/ an expiration 2008-09 date code.

Here are images showing the interior contents of that Porsche 7L5 860 281, where someone opened the cellophane wrapper. It looks like a nice kit.


-
1
-
-
My 2004 Porsche Cayenne Turbo included a first aid kit, Porsche part number 7L5 860 281, made by HANS HEPP Gmbh & Co., in a heat sealed cellophane wrapper. That kit was retained after the vehicle was sold and now resides in my 2022 Porsche Macan.
There is no idea what is contained within the kit, as I haven't broken the factory sealed cellophane.
Of interest / concern, the manufacturer marked the label w/ an expiration 2008-09 date code.
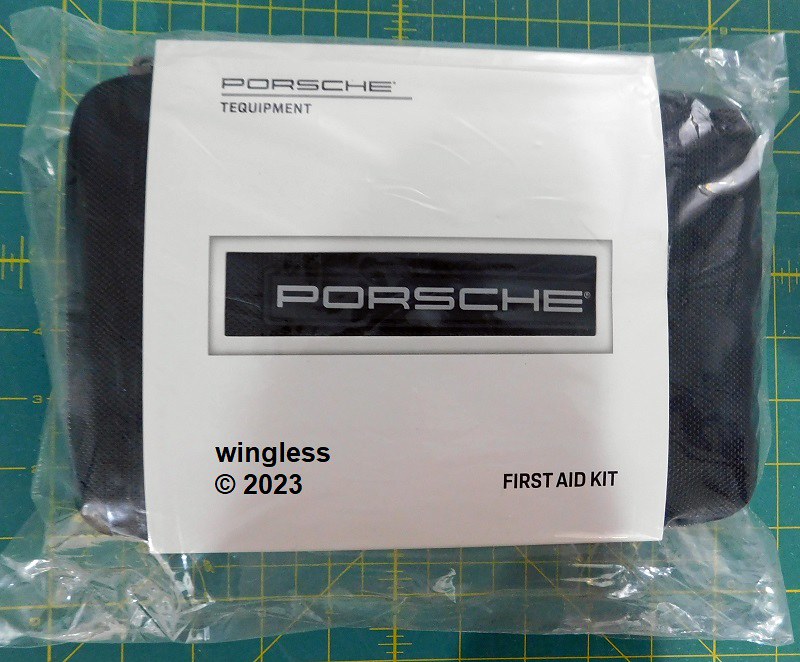
A Porsche PNA 444 197 4 Porsche Tech Equipment First Aid Kit was purchased for my '86 911 Targa, now residing in a great unused volume underneath the front passenger seat (NOT lots of storage volume in that vehicle).
One REALLY NICE feature of this kit is that the cellophane wrapper may be opened and sealed closed, creating MUCH greater likelyhood of using the interior contents. It is also great to be able to examine the parts within the kit.


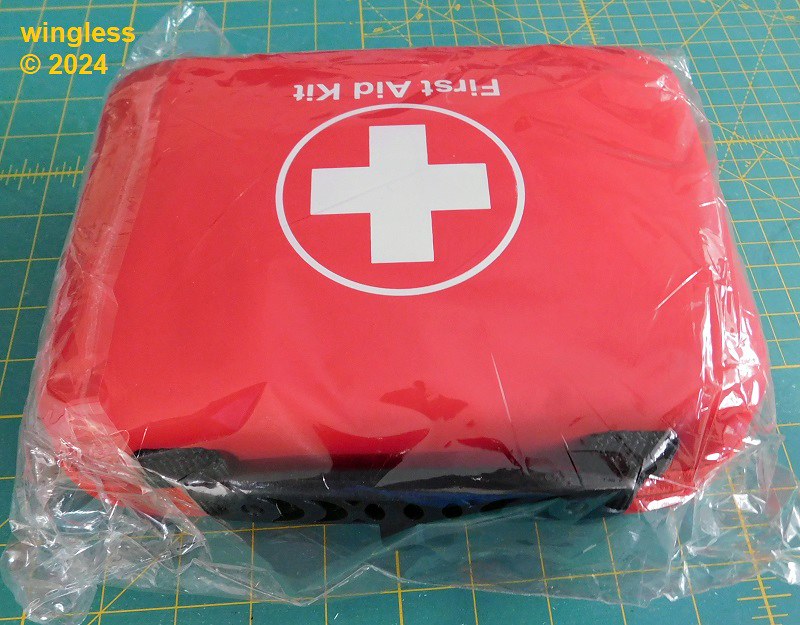
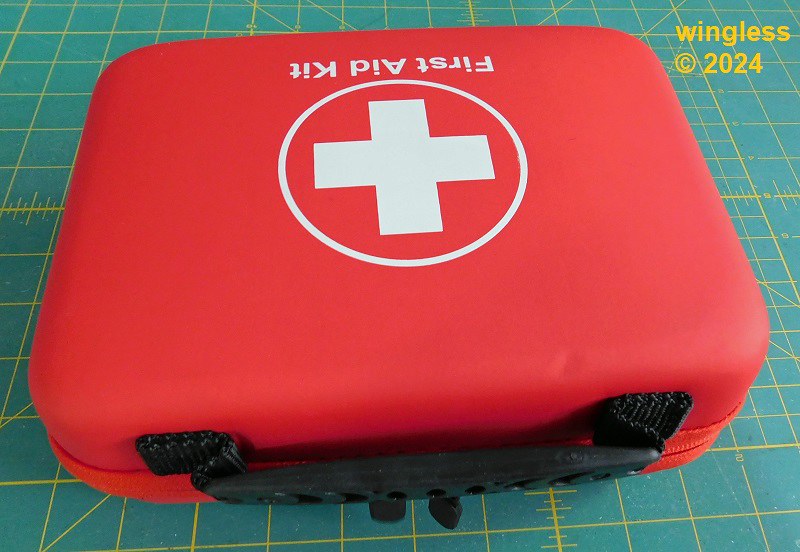
A nice / generic / complete first aid kit was purchased for my 1968 Fiat 500L.
This also has cellophane that my be opened and resealed which is also great for this vehicle, permitting usage while helping to keep this kit clean, also NOT lots of storage volume in this teeny vehicle.


-
34 minutes ago, Eric - TIA said:
I know you have it inside your trailer but is it IP{ rated for outside if we want to put it on an open trailer or would it be too easy to steal?
The camera system is listed as IP69. Both camera types appear to be reasonably weather sealed.
All cameras have a molded water resistant round DC power connector on the end of a ~1 foot cable.
In a high theft location, usage of the trunnion mount instead of the spherical mount, would permit "easy" removal, by removing the two pivot screws, leaving the u-shaped trunnion bracket in place, and unplugging the camera to relocate to a secure place.
The spherical mount style would require removing everything for theft protection, because the camera is the sphere and the permanently attached cabled antenna connector is on the cast aluminum base.
My application has one exterior spherical camera on the top, rear of the roof, at the far end of a ~30 foot six horse trailer and one exterior trunnion mount camera on the top edge of the bed, under the crew cab rear window. There is also one of each type inside the trailer, at the front and the rear.
My concern was signal strength, but all cameras show full signal strength bars.
-
3 hours ago, Altan said:
I don't think at the time it was made the brands were considering safety issues as the do now. This looks like from 1950s.
Thanks for the clarification.
A check / comparison to this new Grizzly planer shows the expected electrical control deficiencies on the old versus new. That includes the easy access big red mushroom off switch and logic to prevent automatic restart when interrupted power is restored.
Nothing else jumped out to me. Anything else that should be identified?


Mystery brand
in Collector's Resource
Posted
Welcome to the forum.
The logo is Chicago Pneumatic.
No idea on the applicable tool.