


wingless
-
Posts
710 -
Joined
-
Last visited
-
Days Won
73
Content Type
Profiles
Forums
Events
Posts posted by wingless
-
-
That Libman brush is also great for removing the vacuum cleaner nozzle marks, to have the carpeting w/ a uniform nap finish.
Just brush the vacuumed carpeting in the same direction.

-
 1
1
-
-
100% keep the wife happy!
No science experiment exemption available?
Long ago we built an altitude chamber for work, w/ a vacuum pump and vacuum tank (like a reverse air compressor) w/ a computer controlled regulator / gauge, so we could set the "altitude". It worked great, w/ the vacuum pump kicking on and off to maintain the vacuum reservoir while the regulator maintained the chamber setpoint.
It started out w/ all clear plastic until we discovered it didn't work for interior thermal control w/o interior air, so we changed the lid to aluminum, then it worked great.
-
Yes, immediate action should be taken to identify and resolve the source(s) for the leak(s).
My prior home had an intermittent persistent leak at one specific location.
Roofing companies were brought in an all wanted to replace the entire intact roof just to fix a problem at this one spot that only saw water when when driven at a specific direction, as it was covered under a larger roof.
My solution was to dig out the black roofing tar / cement at that location. I discovered someone had used several tubes of silicone sealant which prevented adhesion of the roofing tar.
All that was removed and replaced w/ fresh roofing tar and it never leaked again.
-
A small vacuum chamber, w/ the ice cube tray within the chamber, placed in the freezer, would evacuate the small air bubbles suspended within the ice cube water prior to freezing, greatly increasing the clarity.
My suggestion would be an aluminum (or at least partially aluminum) vacuum chamber to improve the thermal conductivity between inside and outside.
Note that one of the three big thermal transfer methods is eliminated by this setup. The convection is gone within the vacuum chamber, leaving only conduction and radiation to freeze your clear ice cubes.
-
It was initially not clear to me why the ice cubes formed in the top tray of this four tray stack were pristine, while all the ice cubes formed in all the lower trays had fractures.
My slow brain finally realized that it was from water expanding while freezing, but the ice forming in the lower trays could not push up the mass of the upper trays, so those cubes would have fractures.
My solution was to put trays w/ water into the freezer w/o stacking upper trays on top for at least several hours, until the top of the cubes had hardened.
Now my cubes are all properly formed w/o fractures.
-
-
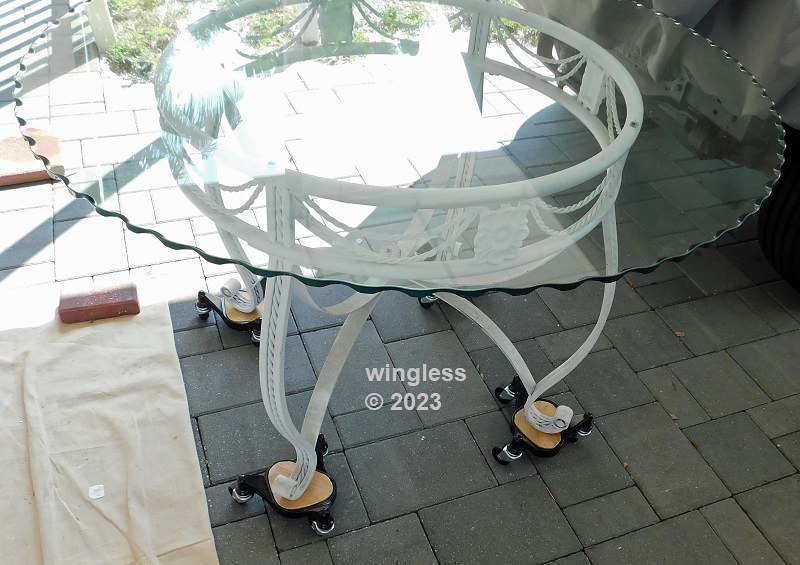
Completed usage of these restored / updated dolly set.
It worked out sooo well for shuttling this large / heavy / awkward table around while working on the area, then replacing at the correct location.
Now back to the tool room shelf.

-
Same spec tools just different color?
-
11 hours ago, Altan said:
I have used Festool sanders connected to their vacuum, they are amazing, but they also have a limit and you can not push more than that limit, that is what I meant.
Agreed
On mine, I've used it for thousands of hours, always at maximum vacuum suction and almost always at 4 of 6 speed setting.
My experience is VERY infrequent maximum pushing force (almost never) and virtually always just let the tool do the work with normal hard pushing force.
Some project require new / sharp paper, then those discs are stacked for later reuse on less demanding or on greater damaging projects before finally being discarded.
Sometimes on certain paint removal projects it will still clog the paper and I sometimes use a utility knife blade to pop off those paint globs from the sheet.
-
Or how about a tile removal tool and replace w/ current style tile?
-
1
-
-
How about carbide OMT blades to remove the old grout for replacement w/ new?
-
1
-
-
5 hours ago, Altan said:
Every tool or accessory has a limit, if you use a sander for a long time or with too much pressure the heat produced by the friction can melt the plastic or glue (if used), at least you know the limit of the tool now to not overuse it next time.
That is one of the HUGE advantages of the Festool vacuum sanding system.
The airflow / debris removal cools the paper and the pad. The debris removal helps prevent the paper from clogging and becoming useless.
-
1
-
-
Welcome to the forum.
Careful usage of a utility knife blade can remove the sandpaper fabric from the pad Velcro.
-
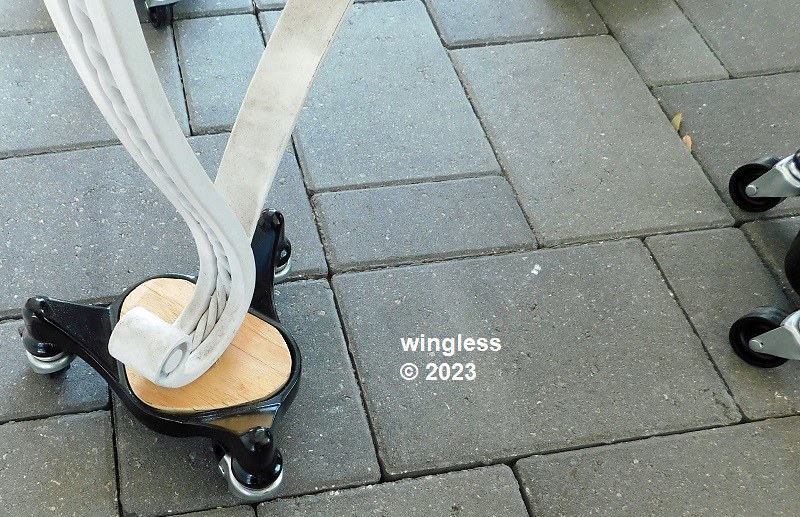
My immediate requirement for this dolly set was to shuffle around my heavy welded steel frame / thick glass top table on my front patio, over a paver surface. The table frame diameter is about 3' and the thick glass top diameter is 4'.
Moving this table w/o the dolly set is a two person job. It is easiest to first remove the table top, then reposition the table frame.
My first effort using the dolly set resulted in the table feet shifting around in the dolly pockets, until the dolly would tilt, inhibiting desired movement.
My solution was to make a paper template of the dolly pocket. That template was used to make four plywood inserts out of scrap plywood. The plywood insert was drilled to have a hole matching the foot on the bottom of the table legs.
The result is exactly what I hoped / expected.
Now I can easily move this table around on my pavers, permitting me to repair / paint those exterior surfaces w/o the table being in the way.

-
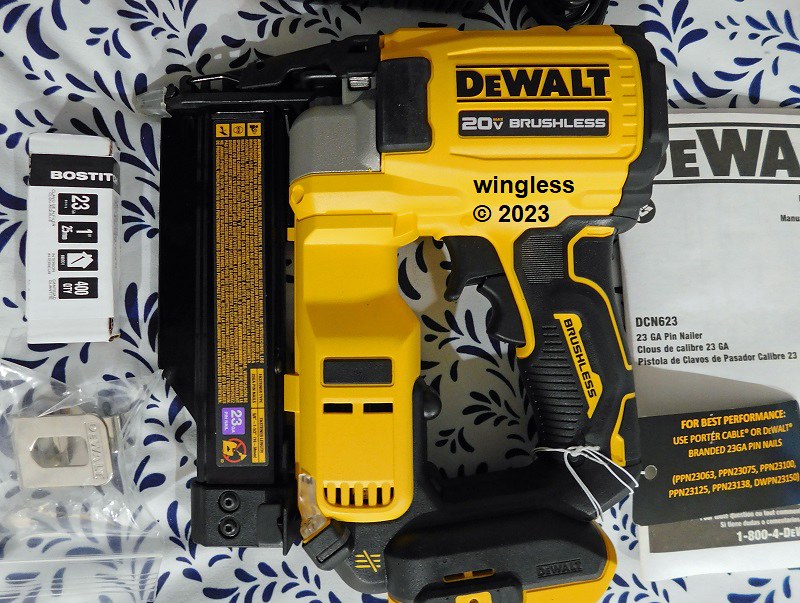
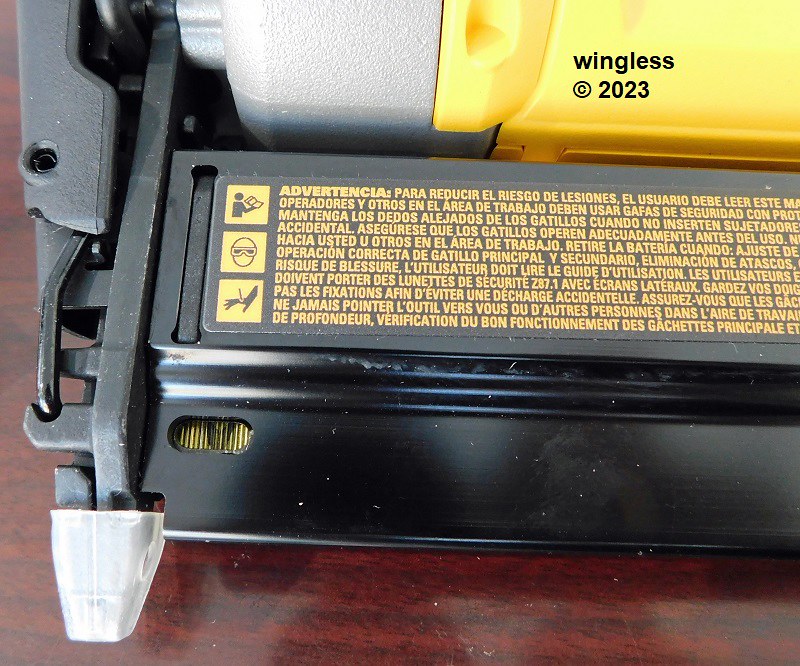
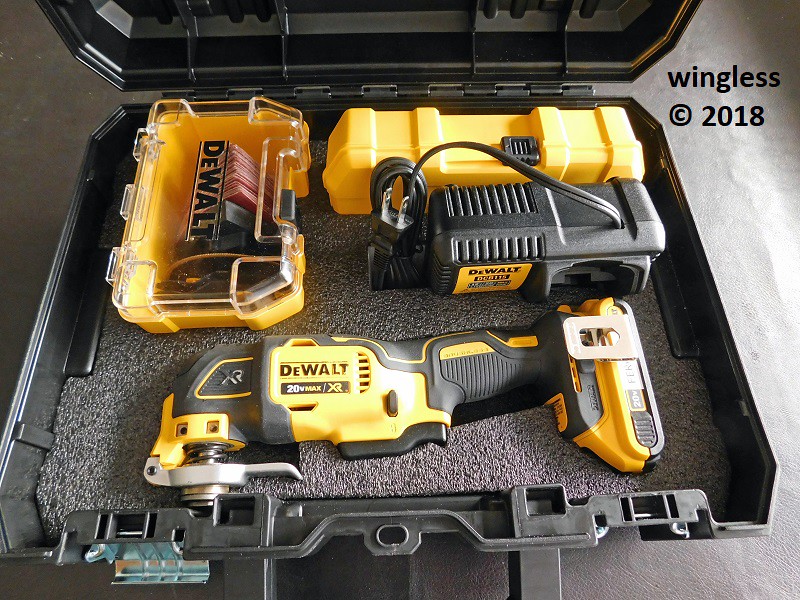
This topic shows my DeWALT DCN623 tool kit.
-
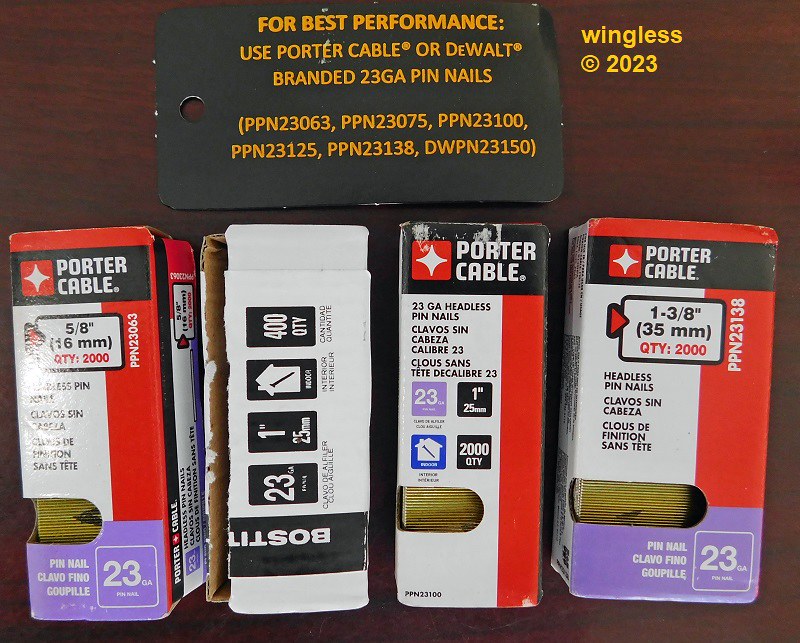
Recently I took advantage of the President’s holiday sales to purchase my DeWALT Atomic Compact DCN623D1 23 GA pin nailer kit.
This is a very nice tool. It is provided as a complete kit, ready to use, even w/ a small batch of 1” nails.
The tool is specified for usage w/ nails from 5/8” to 1½” length.
The DCN623D1 kit includes these parts:
- DeWALT DCN623 23 GA Pin Nailer tool
- DeWALT DCB203 2AH 20V MAX Compact Lithium Ion Battery Pack
- DeWALT DCB112 1.5A 12V MAX / 20V MAX Charger
- DeWALT N261499 11”x9”x7” Small Soft Tool Bag
- DeWALT N268241 Belt Hook w/ M3 0.5 10mm Screw, both loose
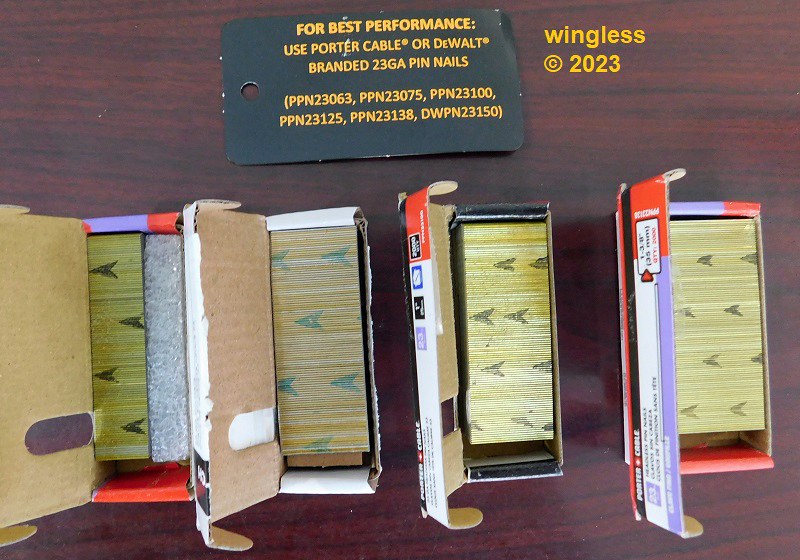
- Bostitch PT-2325 1” 23 GA Pin Nails, special 400 quantity partial package (Funny, tag included w/ tool stating best performance when using Porter Cable or DeWALT nails)
Additional nails were purchased to permit appropriate flexibility on this tool. I purchased these nails:
- Porter Cable PPN23063 5/8” Length 23 GA Headless Pin Nails, 2,000 QTY
- Porter Cable PPN23100 1” Length 23 GA Headless Pin Nails, 2,000 QTY
- Porter Cable PPN23138 1-3/8” Length 23 GA Headless Pin Nails, 2,000 QTY
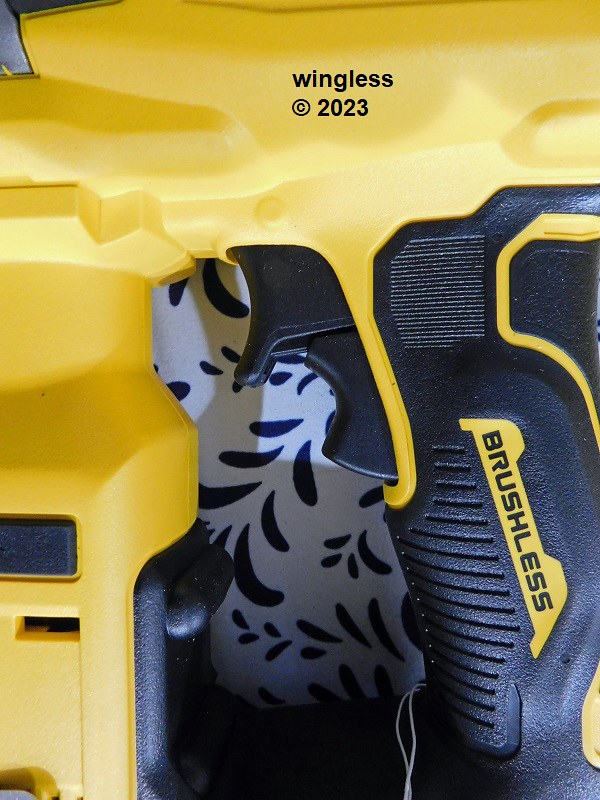
My initial reaction is that I’m really loving this tool. It is lightweight, easy to use and appears well designed and well constructed.
It was surprising to me that this tool can fire a nail, like a gun fires a bullet, through the air and not have a prerequisite for firing to first have the no-mar tip nosepiece being compressed against the workpiece. On both my DeWALT DCN660 16 GA finish nailer and my DeWALT DCN650 15 GA finish nailer these have a spring loaded nosepiece that must first be compressed into the workpiece before those nailers will fire.
By contrast this DCN623 has two adjacent colinear triggers, a primary and a secondary trigger. Both must be squeezed for the nailer to fire. A VERY BIG PLUS, is that removal of the battery prevents the tool from doing anything, including firing. There is zero evidence of ANY residual charge once the battery is removed. Squeezing either / both triggers immediately after battery removal DOES NOT activate the headlight and does not fire a nail. This tool is VERY SAFE immediately after battery removal!
Squeezing the secondary trigger turns on the headlight, aimed at the tip. Then, also squeezing the primary trigger fires the nailer, countersinking the nail below the surface leaving a tiny hole.
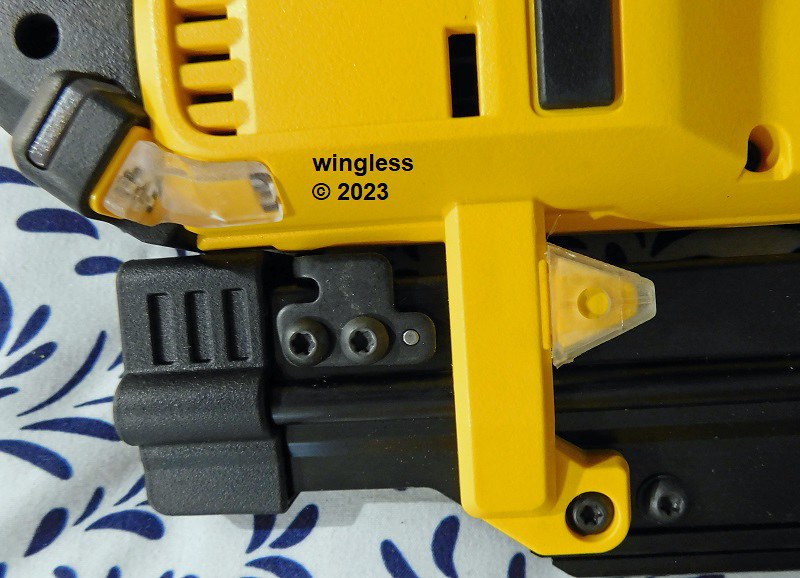
This tool also has a dry fire lockout, w/ a red lockout light, disabling the nailer until additional nails are loaded. The lockout is specified to activate when about ten nails remain in the magazine.
It was not initially immediately obvious to me on how to load the nails. The instructions were not helpful in this regard. Clearly, slide open the magazine and put a strip of nails into the opening. What wasn’t initially obvious is that the strip must be slid into a channel, on the tip side of the magazine.
The nail strip has a repeating arrow printed on the strip to show loading orientation.
When nails are loaded there is a window in the magazine that permits visual observation of the nails.
There is also a depth adjustment wheel, but I have not needed to change the initial setting.
So far I have not needed to use the tool-free nosepiece jam clearing function.
My only concern is the future atomic waste disposal requirements. Hopefully the City has appropriate provisions.


-
Ice cubes.
-
Squeeze tool change release lever?
-
An online search has revealed that there are also newer versions of the three wheel Bassick dolly.
The newer versions are much lighter duty. The newer versions are made of stamped steel instead of cast iron. The newer versions have smaller / lighter duty casters. There are currently several listings on eBay for those newer Bassick dollies.
Here are some images from eBay that are representative of the currently available Bassick dolly listings.


-
1
-
-
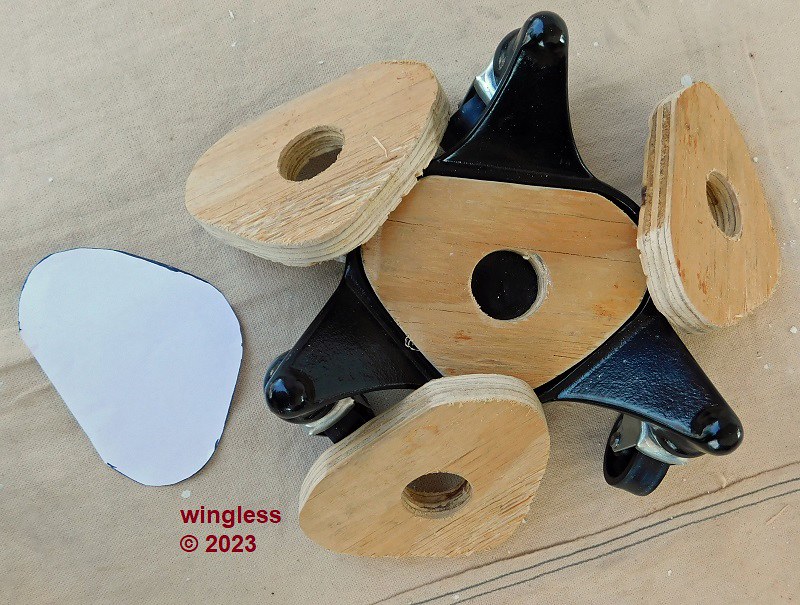
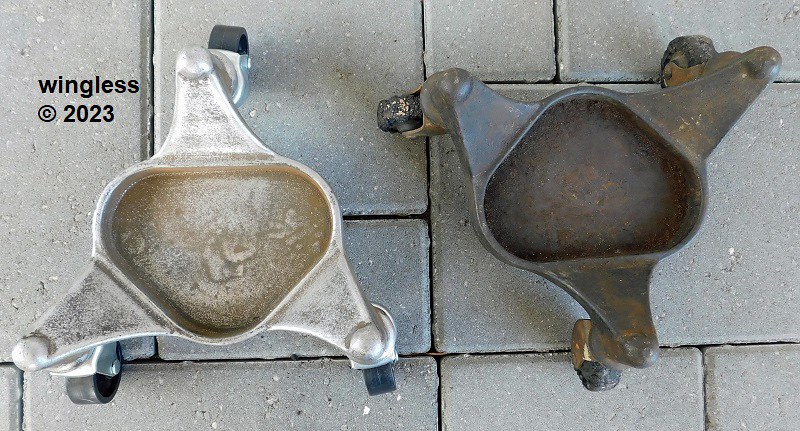
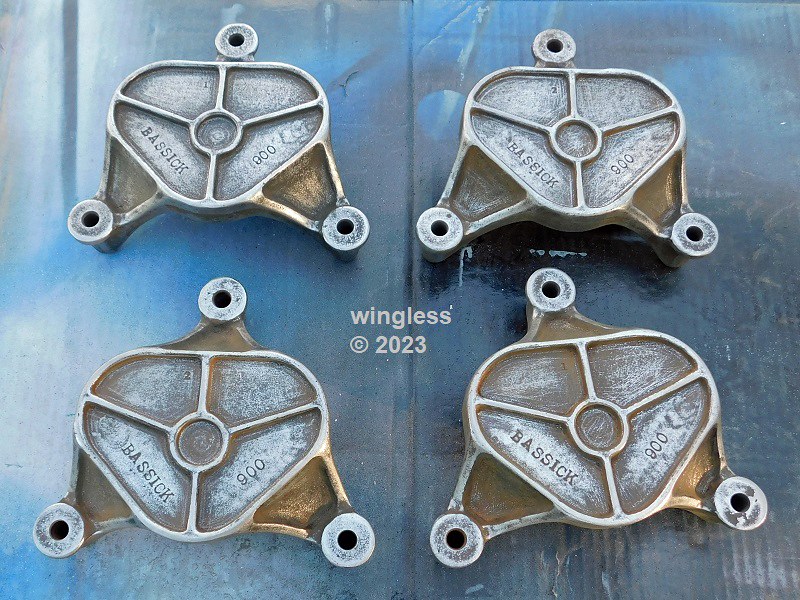
Long, long ago I somehow got this set of four antique Bassick 900 three wheel furniture dollies. These might have been in a house I purchased right out of college, but I don't remember.
They are really handy, put a leg into a pocket then roll the heavy furniture around.
The wheels all had severe age degradation, then eventually one broke off, greatly decreasing the utility of this set.
I have an upcoming need for this dolly set, so I decided repair, then also decided restoration was in-order.
Much to my surprise, Bassick is still in existence, established in 1878, still making casters under the Shepherd brand name. A set of twelve Shepherd 2" diameter polyolefin caster, 90 lbs capacity each were purchased from Amazon for this restoration. It appears that Bassick has discontinued offering dollies for sale.
The old casters were popped out of the dollies, then the cast iron was sanded, filed, scraped and otherwise cleaned up to remove the casting marks and crud prior to painting.
The new caster design is an improvement over the old. The new casters have ball bearing swivels. The old casters used the stem within the cast iron dolly bore for the swivel function.
Once the dollies were cleaned up, the caster holes were masked and the cast iron was painted in semi gloss black Rustoleum Professional High Performance Spray Enamel spray paint.
After the paint dried the new Shepherd casters were pushed into the dollies.
The caster set stacks nicely for storage between usage.
This dolly set will now outlast me...


-
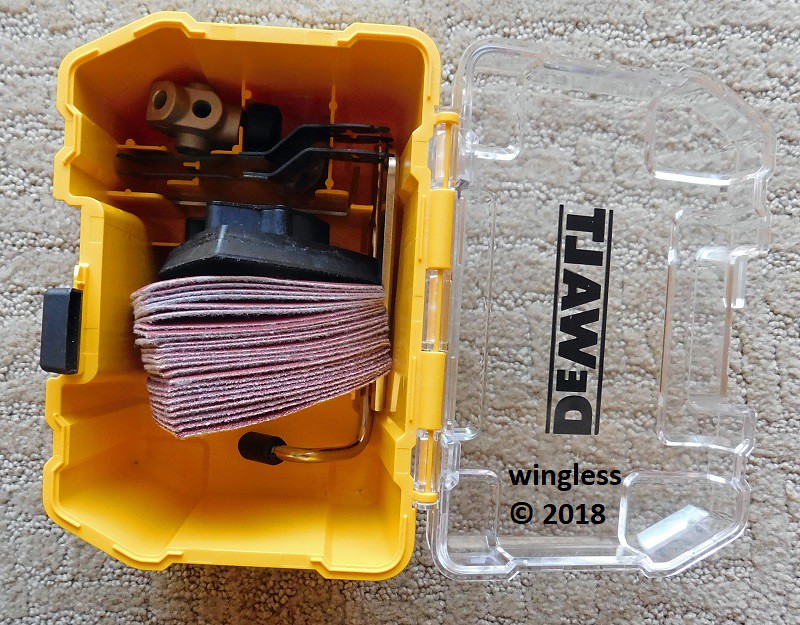
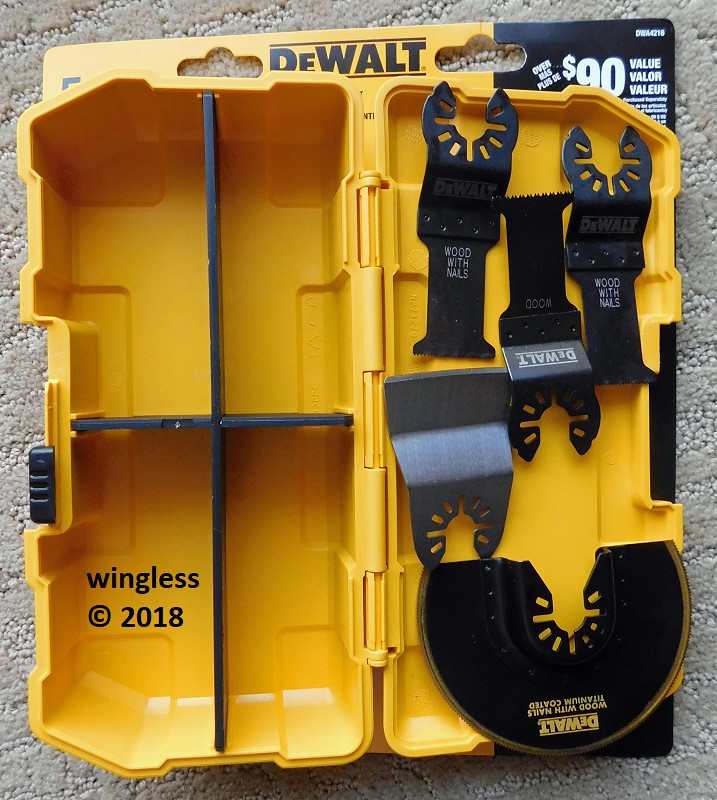
Very nice kit.
My DeWALT N276779 and DWA4216 Oscillating Saw Tool Kits include a pair of boxes w/ fitted locations that I find to be very useful for my OMT accessories.
Both boxes have homes in my custom OMT case.
-
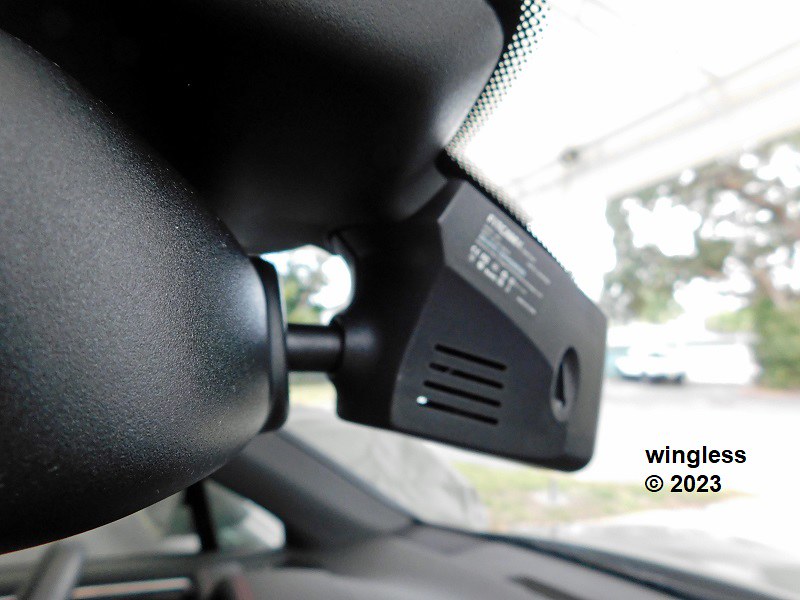
Completed the Fitcamx Front / Rear camera installation.
This is an excellent system and IMO has a VASTLY superior appearance, MUCH more OEM than the Porsche camera system.
-
1
-
-
My first vehicle when I started driving oh so long ago was my father's 1972 Canary Yellow CJ-5 Jeep.
For LOTS of years I have been looking for a good (rust-free) example of a CJ-5 Jeep. They are either rusted of uber expensive.
During my new Porsche Macan road trip this really nice 1979 Jeep CJ-5 Jeep from California auction concluded on Bring a Trailer. I won that auction, purchased that Jeep and had it shipped in an enclosed trailer to southern Florida.
Since then I have been turning the wrenches and spending dollars to make it even nicer.

-
My long-term plan HAD been for me to eventually be buried in my 1994 Grand Cherokee that I special-ordered 28 years ago.
For some reason I recently changed that plan, special-ordered a new 2022 Porsche Macan and collected it at the Porsche US headquarters using their Porsche Experience Center Delivery, with my eldest daughter and I flying in, then me continuing on to an East coast family and friends road trip.
This is a great vehicle w/ great engineering, creation and support. The paint job is AMAZING.
Likely my only modification is this Fitcamx front / rear camera installation.


German brand "BMI" produces German made tape measures!
in Test & Measurement
Posted
Wouldn't be popular in America.
We love / need our fractional inch tape measures. I gave my daughter my cheapo Harbor Freight spare tape measure because it included text fractional markings on the blade, which she found handy (and I didn't even notice existed).
A laser engraved stainless tape measure sounds nice.