


wingless
-
Posts
710 -
Joined
-
Last visited
-
Days Won
74
Content Type
Profiles
Forums
Events
Posts posted by wingless
-
-
There is virtually zero benefit for correctly effecting the requested saw voltage change.
Assuming that the shop is correctly wired, w/ NEMA 5-15 (15A 120VAC) receptacles, or NEMA 5-20 (20A 120VAC receptacles), then the saw will be "happy" running at maximum load all day long.
If I were to effect this change then I would swap the saw plug to a NEMA 6-15 plug and place a properly wired NEMA 6-20 (20A 240VAC) receptacle, some might opt for a NEMA 6-15 (15A 240VAC) receptacle.
That change would halve the current and the saw would continue to operate properly w/ virtually zero effect on performance.
Never, ever, ever, incorrectly wire a 120VAC receptacle for 240VAC!
On a related topic, when I was correcting / updating all the wiring on my 1963 home, there was a dedicated, degraded living room receptacle that was clearly used for a long gone wall unit AC. The wall had long ago been sealed at that location. That 240VAC / 20A / 12AWG was wired to an unrecognizable single NEMA 6-20 receptacle. My upgrade was to swap that to a standard NEMA 5-20 duplex receptacle, wired to a 120VAC 20A panel breaker and properly change the insulation color code from red / red to black / white.

-
 1
1
-
-
That sucks.
Being American, my go to tools for this type of repair are a hammer, a cold chisel and a torch.
Use the hammer / cold chisel on the interior to start a notch.
Use the torch to quickly heat the material, but not the pipe that is being unscrewed, then quickly attempt to unscrew the pipe w/ hits from the hammer / chisel. It might be required to have several notches as the chisel digs into the pipe to avoid damaging the other part.
Note it would be better to freeze the part first if possible.
-
Welcome to the forum.
Why not post an image(s) and also share ideas about the potential options being considered for hiding the bathroom door?
-
My suggestion remains to study the structure to determine where / how the house load is being supported.
The vertical lvl beam is supporting multiple existing 2x4 posts. The other image shows a similarly placed vertical lvl beam.
It may be that particular location is an important place for load support.
Yes, it is possible to configure temporary load supports, but that depends on first understanding the structure.
-
1
-
-
That "new" vertical laminated veneer lumber (lvl) post is supporting original construction multiple 2x4 studs.
Note that the "new" small header studs are providing zero structural support because they have no support on the ends.
The best course is to study the construction from the attic to the basement to determine and understand where / how is the load supported, to correct any prior / existing mistakes, then effect any desired changes that provide proper structural support.
-
1
-
-
-
Thanks for the update.
Strange that the adjustment range is insufficient.
Note that the jaws shouldn't be adjusted for no gap (per your linked instructions).
Glad it worked enough to get the job done.
Note that his tool is great for a bolt, or other thick metal stuff. A large wire cutter is probably a better choice for a nail.
-
YW, the two "bolts" near the cutting edge are eccentric bolts, to move the cutting edge closer or farther.
Slowly rotate those bolts to attain the specified gap, snug on paper.
-
1
-
-
Welcome to the forum.
That is an excellent link for setting up the tool.
Don't the jaw adjustment bolts (with cam), arrow on bolt face in image, increase / decrease gap?
According the linked instructions, there should be about 0.004" gap (thickness of paper). It looks like the gap is about twice that spec.
It also looks like the neck adjustment bolts should be tweaked slightly to improve the gap uniformity.
-
1
-
-
Welcome to the forum.
In the old days there were wooden pencils w/ erasers on the end.
The wooden pencil eraser is a great tool for cleaning up the commutator.
Remove both brushes, rotate the armature while pressing the eraser against the commutator. Visually inspect the commutator while rotating the armature. It should be smooth and shiny. If required use a fragment of ~600 grit emery paper pressed against the hand-rotated commutator to attain smooth and shiny.
Then inspect / verify / correct all segment gaps to ensure they are clean and are not shorted.
Both brushes must slide freely within brush holders. If the brush end is not good then wrap fine emery paper around a socket having the same OD as the commutator and rotate the socket to clean up the brush end.

-
What is the tool model number?
The tool will either have a shaft flat for a second wrench or more typically have a spring loaded shaft lock pushbutton, used when tightening or loosening the disc nut.
No, the disc must be installed to remain tight until intentionally removed.
Please do not operate the tool until that problem is resolved.
-
2
-
-
The hand knob in the second image is loosened to permit the motor to arc towards the front to loosen the belt.
The motor pivots on that arc on the two vertical bolts in the first image.
If the motor doesn't move, then loosen those bolts ¼ turn.
-
According to Page 13, if the motor doesn't move, then loosen the pivot bolts ¼ turn.
Has that been tried yet?
-
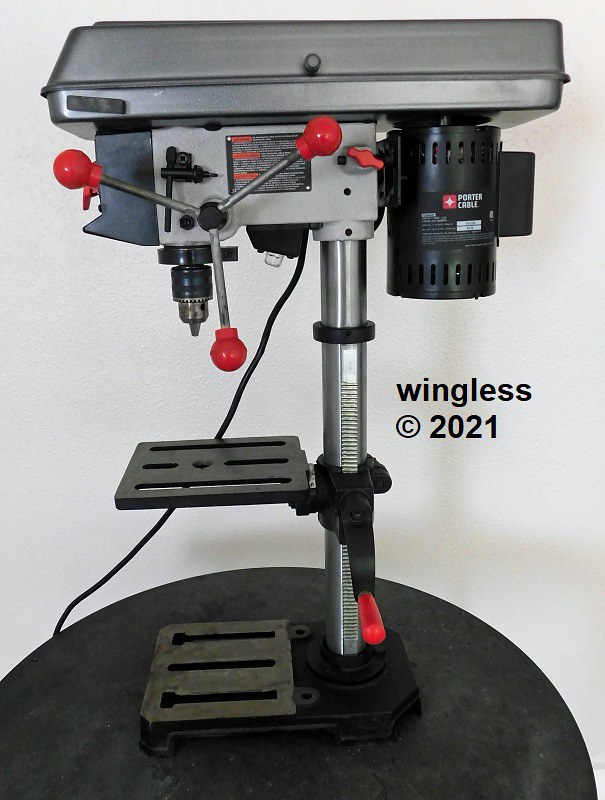
Welcome to the forum.
That looks identical to my Porter Cable drill press. On mine, on the right side, there is a hand knob to tighten / loosen the clamp on a shaft holding the motor at the selected pivot point.
That is described in Page 13 of the Owner's Manual and shown on Page 49.
It may be possible to set-and-forget that adjustment and just increment the belt to the next position while rotating the spindle.

-
Welcome to the forum.
Can you please post images of the parts that are being sought?
-
YW
A thermal lance is an oxy acetylene torch on steroids. It cuts steel, not concrete.
My guess is it has a distinct noise, from the rushing pressurized stream of Oxygen. I'm also guessing there will be a smell from burning steel.
Intentionally increasing the ambient noise could be part of the solution. You don't need to whisper next to a waterfall.
-
Welcome to the forum.
Pardon whilst I finish reporting this to the FBI...
Clearly the contemporary tools are different than those from 1968.
An impact hammer is god awful loud when used in the open, much more so when in a confined space. I always use eye and ear protection. An impact hammer, like my rotary hammer will get through concrete. The issue that arises is when the concrete has embedded rebar.
When examining planned destruction, such as collapsing a building in place, the engineering is to use the existing mass and potential energy (elevated heavy mass) as the significant factory for the planned demise. A series of planned advance cuts to the structure, followed by timed charges cause the whole thing to destroy itself.
For the subterranean destruction, advance removal of the Earth on the opposite side will aid in poking through the concrete.
For steel cutting an oxy acetylene torch has existed for many decades and permits "easy" cutting, also w/ noise and smell.
Plan ahead to have a cake w/ a file delivered to you behind bars.
-
-
Two online vendors are showing the DeWALT DCN623 kit currently available.
One vendor shows the tool only available on May 15.
Woo hoo. FWIW, I am waiting until I need this for an upcoming project.
-
Welcome to the forum.
My daughter's new truck does great w/ towing her gooseneck horse trailer.
Big trailers track and back up great when coupled in the truck bed instead of the bumper.
FWIW, I sold my impact gun looong ago for lack of use. I prefer a breaker bar (for loosening)and a torque wrench (for tightening).


-
1 hour ago, fyrfytr998 said:
Going off my last project that I used my cordless grinder with sustained usage. In order for me to work with no interruption required alternating between five 4ah batteries on fast chargers.
Don't know if you need to run continuously, but that's what it took. And by the time I was done, I wish I had bought a corded grinder instead.
It sucks lemons through a garden hose when waiting for a tool to recover is required.
My experiences were also continuous straight and right angle die grinder usage for multiple days for the projects on which I was working.
-
Welcome to the forum.
Used both the straight and the right angle air powered die grinder for hours and hours, Never considered any form of electric until just now having examined the link.
The DeWALT looks nice. It is MUCH larger than the air powered tools, so I think that is a distinct disadvantage. The cordless operation is a big advantage.
All of my die grinding projects were continuous usage for extended periods, that would require multiple battery packs sitting on chargers. Not an issue for me personally.
From a spec, a vendor and a manufacturer perspective, all look good to me.
Please report on results.
-
14 hours ago, Valentine1983 said:
To find the best plumber, you need to know the opinions of different customers. Some plumbers do quality work for some customers and not others.
Welcome to the forum.
My beautiful daughter gets everything she wants by batting her eyelashes...
-
Welcome to the forum.
My speculation is that the added hose increases the pressure, preventing the venturi effect from drawing fluid.
Is there a less restrictive nozzle available for using when adding the extension hose?


3/4" Drive Drill
in Power Tools
Posted
Welcome to the forum.
Will this SDS Max to 3/4" hex adapter grab onto the bit shank?