


wingless
-
Posts
710 -
Joined
-
Last visited
-
Days Won
74
Content Type
Profiles
Forums
Events
Posts posted by wingless
-
-
Stainless is nice, except in this application it will show permanent scratches.
-
Ask for a volunteer from the studio audience.
-
 1
1
-
-
That looks nice.
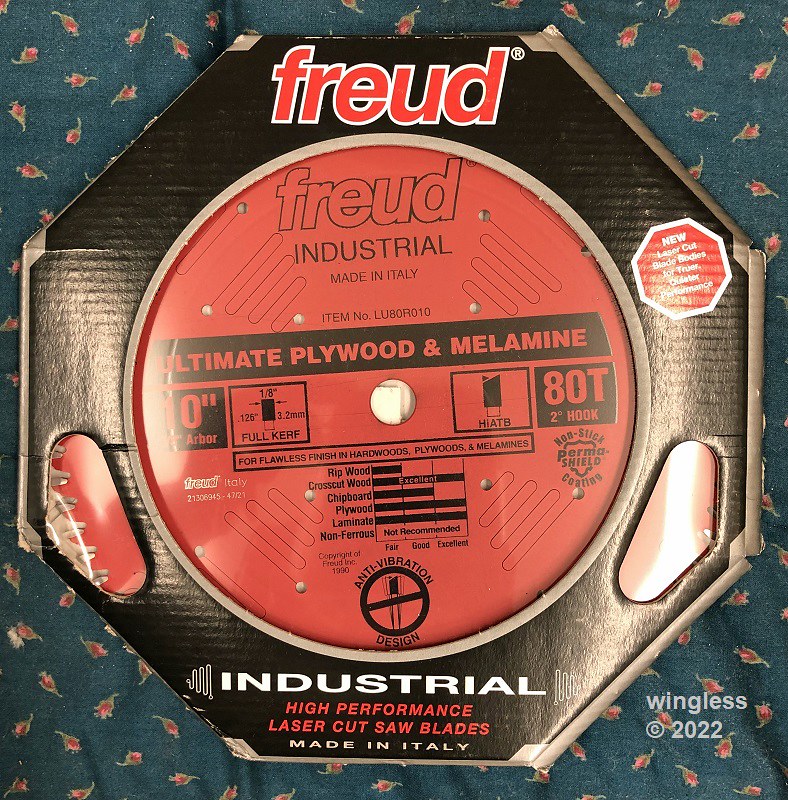
Many of my blades come in vendor packaging, like this one from Freud.
-
Vendor says 6-8 weeks for availability. Other vendor is ball parking availability around June 1.
-
4 hours ago, ScottLinoX said:
Renovations bring life to your home. Even a little remodeling helps you feel like you're in a new home. Just recently, I decided to turn my basement into a game room. I hadn't been down there in a while, and there was a lot of water when I went down there.
Welcome to the forum.
The subterranean rooms can present extra difficulties wrt to moisture and ground water. All those issues may be addressed / resolved w/ appropriate fixes. Typically those fixes should be implemented first, but some can be added afterwards w/o ripping out everything.
Why not create a new topic, including images, so all members may provide appropriate input?
-
Thanks.
The company ends the video w/ a web URL saying to purchase the DeWALT DCN623 at that site, but currently not listed.
Hopefully soon.
-
Welcome to the forum.
100% sure you are not alone in effing up something.
Why not post an image(s) showing the problem (saving a kiloword w/ each image) to permit others to help better.
Also, providing the model / mfg numbers for the tool and the disc will probably be useful.
-
1
-
-
Welcome to the forum.
That Mod-U-Blast sand blasting cabinet looks like a great tool.
The Owner's Manual says to check for media leaks but doesn't define how to fix that problem.
My suggestion is to call the manufacturer and see what they say.
Please update here during the resolution.
-
Thanks much.
This reply is dedicated to the tool, not the projects. This was my first project using the MC (metal clad) wiring, so the Roto Split tool was essential.
I started wiring houses as an early teenager, now it is second nature to me. I have wired many houses, plus many, many wiring projects.
At one point I owned a 150 year old New England farm house that was built prior to wiring, interior plumbing and central heat, so I swapped out EVERYTHING to be correct. That was prior to THE BEST wiring invention tool, the blinky / chirpy voltage sniffer hand tool. Despite my best efforts at safety, I was electrocuted more times than I can count working on that house. (I still HATE getting electrocuted.)
There will be multiple topics posted on the projects for this house, w/ one big one dedicated to the wiring. This house was built in 1963, prior to requiring dedicated ground wires, instead using the conduit for ground. The Earth ground was not even close to current standards. The entirety of the wiring has been reworked and is now terrific.
-
1
-
-
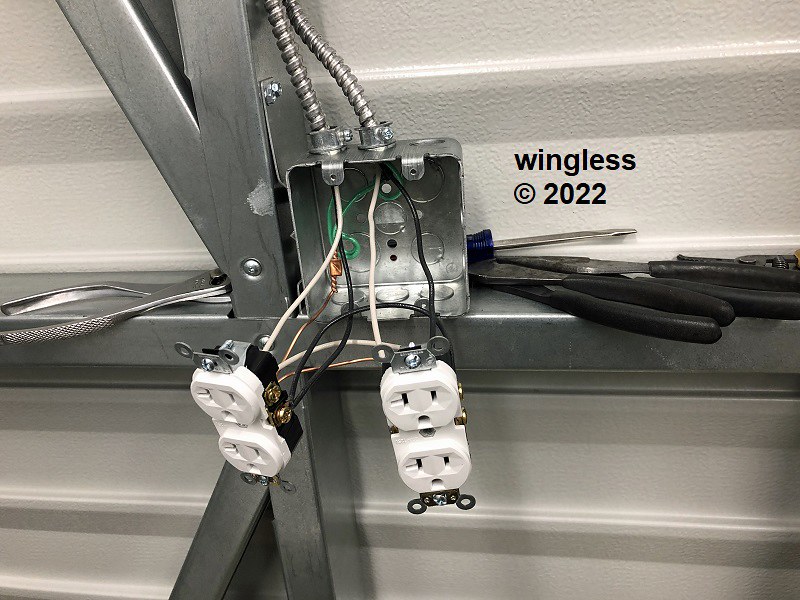
My recent Lark Builders Lumber Jack End Gable Accu-steel shed was just wired by me in the plan to become my new workshop.
For this wiring I selected 12/2 MC wiring, for 120VAC / 20A receptacle circuits. I also have 12/2 MC wiring for the interior / exterior lighting and the thermostatically controlled exhaust vent. There is also a 240VAC 10/2 circuit for the tankless water heater (so I can wash my dirty hands in a small sink). Note that 12/2 MC also includes a ground wire, like the plastic jacket NM-B wiring, except the MC wiring has green insulation on the ground wire, not a bare copper ground wire like the NM-B cable.
This is all powered through a properly wired / installed Siemens PN 125A PN3048L1125C sub panel.
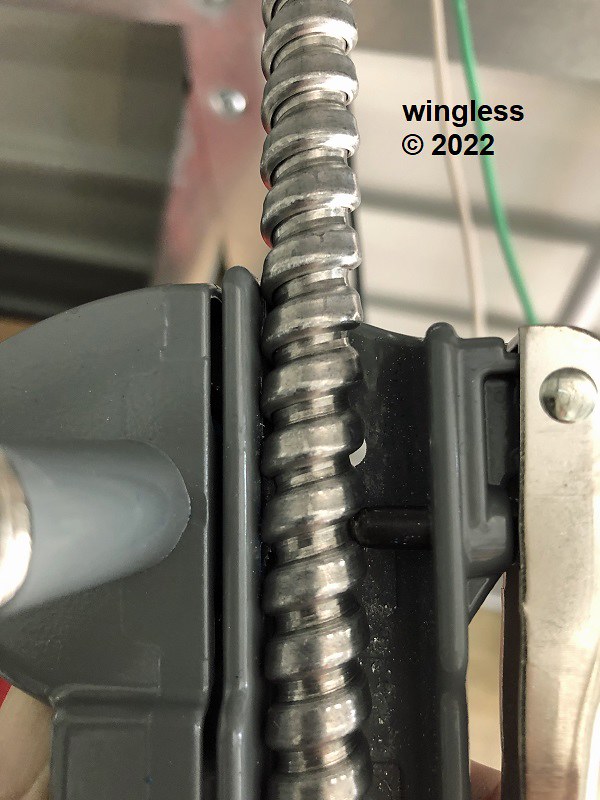
The tool I selected to remove the MC sheathing is a Southwire Roto-Split RS-101A armor cutting tool.
This tool is super easy to use. Lay the cable into the trough, hand squeeze the grips, one grabbing the cable, one pressing the saw into the armor sheathing, then hand turn the crank until the fine tooth cutting wheel is felt to spin freely, having easily finished cutting a slot though the aluminum sheathing.
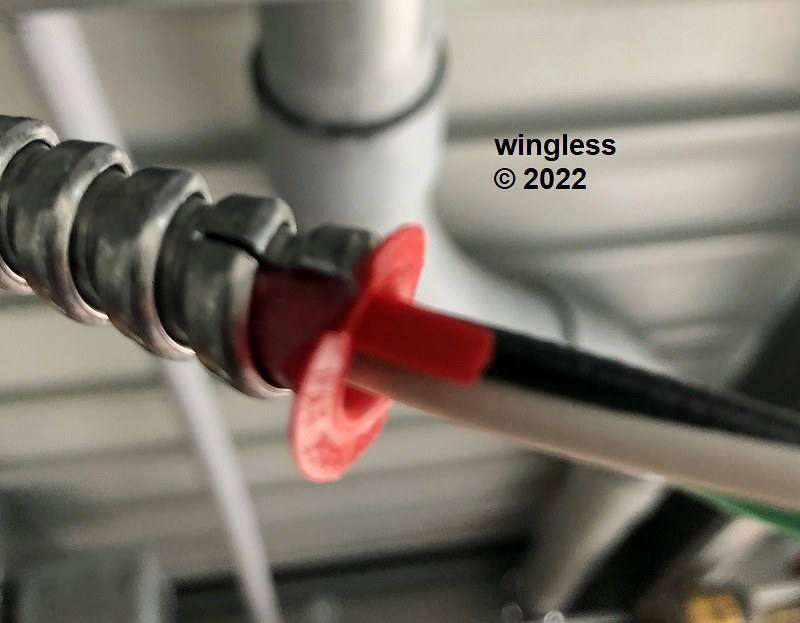
The cut sheathing is then unwound a ½ turn to disengage from the end, then slides right off, exposing the desired conductor length.
When I changed from using 12/2 to 10/2 I discovered the size adjustment screw required to be loosened by one turn. The adjustment was restored once that sheathing was cut.
This is an excellent tool and I have zero hesitation recommending it for this application. It provided flawlessly on well over 50 uses.
Note that the walls / ceiling are insulated w/ Kraft faced fiberglass batting, the ceiling covered with painted sheetrock and the walls covered w/ sanded plywood.


-
 1
1
-
-
IMO the larger one is perfect size. I’ve used mine for hundreds of hours.
Smaller would fit into smaller spaces. That has never been an issue for me.
Smaller is lighter. I’ve done hundreds of hours over my head. Lighter would be better, or anti gravity.
-
3 hours ago, Aligned said:
When is the release date for the 20volt 23 gauge pin nailer!?
Welcome to the forum.
Here is the topic on that subject. Please keep the content in one place.
To my knowledge, there is not a release date yet on that tool.
-
That is a beautiful saw.
It is complete, w/ the sliding miter, rip fence and blade guard, plus all the manuals. Frequently used saws are missing those parts, especially the blade guard and manuals.
Someone would be VERY happy to get that for $100.
My guess would be to ask $500 and sell for $450. (I could be totally wrong on these prices, just seat of pants guess)
My suggestions would be to assemble the pipes for the rip fence and the blade guard so it looks complete.
-
Welcome to the forum.
Note that if the plan is to do multiple sections and reposition the work, then it will be very difficult / impossible to not have visible discontinuities at those locations. That problem is severely increased because of the complex 3D contours of the work.
It is also required to have very fine step size, a function of both the tool and the software, to not have unacceptable stair steps on all those curves. There will be stair steps, but they must be as small as possible, if that is the desired end result. Small steps increase processing time and cutting time.
Cannot help w/ the other questions...
-
There are very few times I use the medium sanding pad.
On flat surfaces I use the hard pad. On contoured surfaces I use the soft pad.
-
1
-
-
Is usage of a different cutting tool (different circular saw or a table saw) an option, to permit usage of one of these Freud Ultimate Plywood and Melamine blades?
-
Welcome to the forum.
The Festool ETS 150/3 is my go to sander for fine sanding. The Festool ETSC 125 also looks great..
It may work better when working to finer grits. Mine go to 4,000 grit for some projects.
-
1
-
-
Welcome to the forum.
For both my 7¼" circular saw and my 10" table saw I have a Freud Ultimate Plywood and Melamine blade, LU79R007 for the 7¼" and LU80R010 for the 10".
For your Ryobi 165mm blade diameter w/ a 16mm arbor, unfortunately the Freud Ultimate Plywood and Melamine blades LU79R006M20 or the LU96R006M20, both 160mm diameter but w/ a 20mm arbor won't work.
All these are rated by the manufacturer as excellent for melamine.
A correct application carbide blade will have the best results / life.
-
Welcome to the forum.
It sounds like you have quite the find. Why not post images?
That saw was not located on line, but the other tools from that manufacturer look great.
-
Welcome to the forum.
It looks like that Freud FT1702VCEK router will work w/ any standard router table.
Here is my router table. It eyeball measurement looks compatible.

-
@ds1848, welcome to the forum.
Thanks for your terrific and thoughtful post (and PM).
Your experience about the difficult initial movement matches mine. As I posted, fortunately I had a 14mm crowfoot wrench and a long breaker bar to apply massive force to break that 9-year stationary eccentric free. Once free, a regular combination wrench permitted normal rotation for the proper setting.
Don't worry that the worm gear is not centered on the pinion gear. The designed action of the eccentric nut moves the worm gear closer or farther from the pinion gear (desired / required action) but it also moves it side to side along the pinion gear (acceptable action).
This is an amazing saw, except when moving / relocation is required. My personal home move (in progress) required me to partially disassemble for SUV cargo area transport to setup into my new workshop (still under construction). The saw does not get any lighter as we both increase in age. I yanked all the loose stuff, standard side hanging brackets, things I bolted on (rear hanging hook and rod), side granite wings, rear dust port and the motor, all to decrease the mass and avoid damage. One thing I noticed when removing the motor is the double D cord grip would not release from the electrical cover, so I left that attached to the cover and just disconnected the wiring.
-
1
-
-
Welcome to the forum.
It doesn't appear to have been impacted w/ a BFH, so the intended usage was w/ a hex drive, not a hammer.
-
1
-
-
@Sam Munwelcome to the forum.
Yes, I also "discovered" that the DeWALT 20V MAX battery will "appear" to connect in the charger if placed w/o fully seating. My process is to squeeze the latch when seating into the charger so it fully engages.
-
1
-
-
Welcome to the forum.
All of my topics use still photography to document the information, saving a kiloword w/ each image.
All of my images are edited to frame the important content. to optimize the exposure and contrast, for size at 800x600 pixel and to add my watermark to limit others usurping my content w/o permission.
My shared images are stored on Flikr to aid my efficiency. There are other sites w/ the same functionality.
There are less than a dozen videos I've used for documentation / instruction and those are hosted on You Tube.


Stainless steel is what we should use for kitchen worktop.
in Around The House
Posted
Polish won't remove the scratches.
Sanding (w/ appropriate grit) as an attempt to recreate the original "grain" pattern will have limited success, except in corners where that is not possible to access. The initial "grain" was done by machines, repair / rework will be done by hand. The repair will have slight random angular differences that will be visually evident.
The brand new stainless looks great in pictures though.