


wingless
-
Posts
710 -
Joined
-
Last visited
-
Days Won
74
Content Type
Profiles
Forums
Events
Posts posted by wingless
-
-
IMO, Kobalt appears to be a step up from Pittsburgh.
What is your impression on those different manufacturers when you examine their products?
-
 1
1
-
-
For me, quality on hand tools, like screwdrivers, wrenches, ratchet wrenches and sockets is the ability to resist damage from normal and abusive usage. A free warranty replacement is also a good element to a quality tool. One example of infrequent abuse I have performed is sliding a pipe over a wrench to enable significantly greater torque application.
My experience w/ low end tools is that they don't withstand abuse so I don't purchase or use those tools.
My guess is that these Pittsburgh tools fall into that category, w/ the primary benefit being functionality at a low cost.
Uncertain how to gauge quality prior to usage and potential failure.
-
Why not go to Harbor Freight, examine for yourself and report to the forum?
Posting images is also very useful, so feel free to share images.
-
 1
1
-
-
IMO they look like a functional low-end tool set at a decent cost.
They are sold at Harbor Freight Tools so coupons can help decrease the cost.
Not something I would choose, but I have bought stuff from them and it has been fine.
-
19 hours ago, LEGENDZZZ said:
is bitsburge ratchet brand any good?
Pittsburgh ratchet wrench?
-
Why not post picture(s) showing the problem?
-
All my chrome tools have been fine. I have zero concerns w/ tool chrome plating and would not consider it "bad". I attempt to care for my tools so the long term condition remains acceptable.
Most of my chrome plated hand tools are many, many decades old and are doing fine.
The surface finish on the full combination wrench set and screwdriver set bolted to the engine room wall on my salt water boat has deteriorated over the years, but IMO that is an acceptable trade off to keep tools handy for quick service.
No idea on Kobalt versus Stanley. I have both and they have been fine. My Stanley tools are decades older than my Kobalt tools.
-
Here is a good link on the chrome plating process.
-
As an example, restoration of a small and simple to polish part may cost high hundreds to low thousands of dollars. Here is a link w/ prices.
So, a cool old tool that might have cost $20 new, with a value of $5 doesn't make financial sense to throw $1K to make it look better than new.
-
There are many US companies offering chrome plating services.
All are extremely expensive. The per part cost is improved by increasing the quantity of parts provided for that service.
The typical end users are customizers of motorcycles, yachts and high end vehicles, where cost is no object.
Here is one company offering chrome plating services.
Note that this is not a DIY operation. The equipment is massive, power hungry, very specialized and the chemicals are extremely toxic.
The (highly simplified) process is to polish the existing parts to a chrome like shine, removing all the existing chrome plating in the process. The bare steel is then plated in copper. The copper is then polished. There are then several types of chrome plating operations, w/ intermediate polishing, followed by the final chrome plating.
Having a small part restored is very, very expensive, but the result will be amazing.
-
Welcome to the forum.
The tool chrome is a multiple layer polishing and process applied to protect the base metal.
Once the chrome has deteriorated then the restoration cost greatly exceeds the tool value.
The steel used on tools is much stronger than stainless steel, leading to tools made from steel instead of stainless.
It is possible to improve the appearance of chrome tools using metal polish, but the existing damage is permanent.
-
Welcome to the forum.
The DeWALT web page has troubleshooting links and other documentation.
Maybe these links will help.
-
1
-
-
Cool link.

Lots of info available on Li Ion cylindrical, prismatic and pouch cell batteries.
Here is a nice comparison link.
Cylindrical
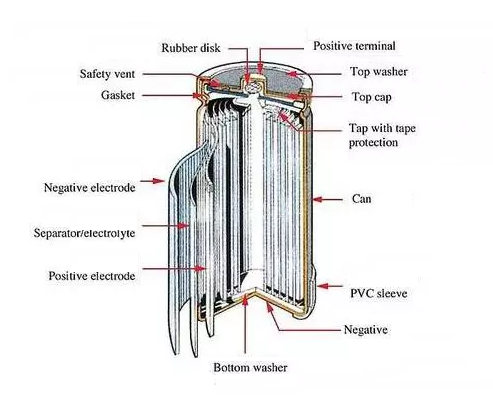
Prismatic

Pouch

Tesla will not use pouch cell batteries, instead remaining with 7,000 18,650 cylindrical cells.
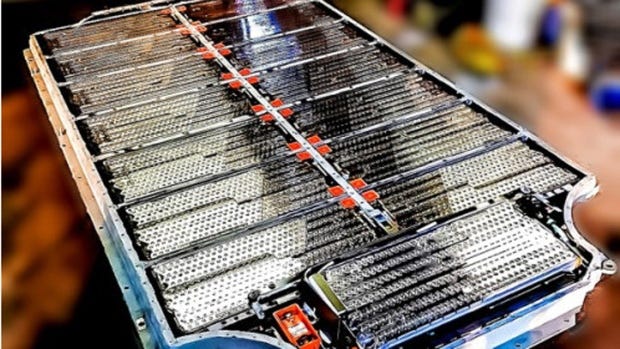
Possibly DeWALT will remain w/ pouch cells only for their smaller Ah packs for safety reasons.
-
1
-
-
Maybe part of the exterior of #9 broke off.
Confirm by manually moving the blade up or down on the unplugged tool, then apply power / turn on, to see if it attempts motion until the broken tooth gap is again encountered.
Or, disassemble the tool to see what is up.
It looks like the end of the armature (103) has a gear that turns the spiral cog gear (9) having an eccentric that causes the blade to go up/down.

-
My daughter and I have remodeled several homes together.
Being thicker than mud I eventually realized I always grabbed her cordless tools instead of my nearby excellent old corded tools.
Then I purchased a set of excellent set of DeWALT cordless tools. Being a single user, I can swap to a nearby battery and drop the existing flat one into the charger.
My corded tools are used for mixing mortar and for demolition.
(I also hate the necessary evile of purchasing printer ink...)
-
Maybe this parts link w/ diagram can help.

What part is not installed?
Is it item 9, the spiral cog gear? That part changes the rotary motor motion to up and down blade motion.
-
Welcome to the forum.
Share some stories and images.
Also old (not as old as you) and some of my favorite tools belonged to my grandfather.
-
It goes waaay beyond SAE and metric sockets.
There is also Torx, triple square, Allen, combination wrenches, flare nut wrenches, Crow Foot wrenches, ignition wrenches, plus all the specialty sockets and wrenches, including security bits.
Back in the 80s my Jeep color coded metric as blue.
At least my BFH works for both SAE and metric.
-
1
-
-
The AC condensation pipe at my southern Florida AirBnB has always been problematic. The internal condensation water is supposed to drain to the exterior of the house, but stops draining properly, then that abatement of flow is detected by the float switch, interrupting the AC operation. The AC stops and the Next thermostat shows loss of power, because the float switch is wired to interrupt the 24VAC transformer power.
This is a single story four bed / two bath beautiful home, with the AC air handler / evaporator in a hallway closet. The water condensation line is routed down through the slab floor, then 20' sideways to the compressor / condenser exterior concrete pad.
The problem is that they then put a 90° UP bend on that buried 3/4" Schedule 40 PVC pipe to pop up through the AC pad to then dribble onto the ground next to the pad.
The open end of the interior pipe is higher than the exterior end so it sort of worked okay, until the buried pipe w/ "science experiment" stagnant water became funny and it stopped draining.
My ongoing long-term "solution" had been to periodically use my wet / dry vac to suck out the disgusting stagnant water in the pipe to restore "normal" draining.
The last few times I was unable to suck it clear. The final time I was unable to suck at all.
Fortunately I had already been planning for a proper solution and had already purchased / received this Little Giant AC sump pump and this Rain Bird VB-STD large rectangular buried valve box.
Note that the sump pump Owner's Manual states in the NOTICE section, "Pump is for indoor use only." My thought is the deep / walled / covered location is sufficiently dry, so I think I'm good even though this is an exterior installation.
My plan was to dig next to the AC concrete pad, cut the drain pipe and route it to this buried sump pump, cover it all w/ the valve box and put a properly wired nearby exterior GFI receptacle for the power.
Every bit of earth in southern Florida is a miss mash of crisscrossed roots, so I use my OMT to aid in that part of the digging effort by cutting the roots, some of them 3" diameter. So I dug down, then dug sideways under the pad until I reached the pipe. Then I kept digging down until I reached the 90° elbow. That was about 2' down. I then dug the pit where the pump is being placed to an appropriate depth.
The pit was being dug in a narrow alley, w/ no room for piling dirt. I used containers to hold the removed Earth There were three box shaped recycling totes that were filled, then a 50 gallon wheeled barrel was filled. (All the roots tossed to the side and discarded.) During replacement the 50 gallon was emptied back into the ground and part of one of the box totes was returned.
The bend and the upward pipe was cut off. Instead of a rush of horrible water, the slow dribble of water continued. I attached the wet / dry vac, then eventually got massive glugs of that horrible water, until that pipe was empty. I ran a snake through that line and encountered nothing (at that point).
The walls of the pit were lined w/ overlapped brick-shaped pavers to an appropriate height so the valve box top would be flush to the ground.
The pipe was routed so it drains into the box. The 90° downward bend was not bonded onto the horizontal pipe in case future removal is ever required.
All the Earth was replaced and packed in place using my mini Thor hammer.
The new GFI receptacle was added to provide power.
Future updates include using the existing pump over full switch w/ pigtail wires. That will be routed to a white 12V lamp and blinking amber lamp w/ audible alert. Those will be placed to be visible / heard on the entrance camera. My thought is the likely possible problem is the GFI faults, killing the pump power. This won't cause a problem for the AC, as the water will just dribble into that new gravel bottom pit, but will eventually cause a mess, in the pit, not in the house. A different AC power circuit will have a 120VAC to 12VDC power brick, so the white lamp will permit visualizing power of that circuit and the blinking / buzzing will permit remote detection of the problem, from my home computer.
Another option for that existing over full switch is to interrupt the AC operation or to drive a relay. This chosen alert method is the best for this remote application. It permits AC operation and alerts me of the problem.
That low voltage alert switch may be configured for Normally Open (NO), used for the alarm described above, or configured for Normally Closed (NC), to interrupt the 24VAC powering the thermostat to shut off the AC when the pump gets over full.


-
It looks like the slots have tapered sides.
The mating detent probably also has tapered sides.
Could careful application of a file on the appropriate side(s) of the slots (possibly also on the detent) cause the resting position to shift slightly, with the spring loaded detent sitting higher in the slots?
-
5 hours ago, Cartoondude135 said:
Guys, I'm happy to inform you all that we're getting closer to cracking this mystery! Apparently, chainsaws can be equipped with a vast array of attachments! Including a cut-off saw!
Yes, when they cut the bare concrete slab floors in several of my homes they used a chainsaw w/ a large water cooled cutoff wheel. (forget about seeing or breathing inside the house for an hour afterwards w/ the windows and doors open)
-
Welcome to the forum.
Please provide those images so that the link does not require me to provide a password.
-
What about resistance roof heating?
-
The link provided has straight shank and Pozidriv bits.
The OP is looking for name brand SDS Plus shank wood bits.
Was a different link intended for SDS Plus bits?
-
1
-


wingless' New Plumbing 1963 House
in Around The House
Posted
The bathroom was completed, the kitchen cabinets installed and the countertop company installed new quartz w/ a sink so I could finally install the disposal and faucet.
Unfortunately the "professional" plumber that cut the slab and replaced the drains, not only installed the bathroom vanity drain too low, they also put the kitchen drain too high, both by a lot.
The only solution was to remove the bathroom vanity, cut the wall and transpose the drains, making the kitchen lower and the bathroom higher. It was impossible to service from the kitchen side w/o destroying the brand new countertop and removing the cabinets.
The kitchen drains were "cheated" as much as possible because even with this fix it is still higher than I wanted / needed, making the disposal drain horizontal to the tee, instead of attaining the correct slope. It works okay.
A complete fix would have been to dismantle the new stack, going up through the roof, but that would have been a VERY extensive rework, removing lots of the bathroom wall and playing w/ the roof flashing, just to improve / correct the slope from the disposal (not gonna happen).
All was implemented, the bathroom wall replaced, patched and painted.
FWIW, as is shown in the images, my "old school" preference is chrome plated brass and bronze supplies and drains, instead of plastic. As part of that preference, I discarded the plastic drain tube that came w/ the disposal, purchased a chrome plated brass tube and discovered the lip flange on the disposal end was too large, so I filed it smaller. I also found a chrome plated bronze tee fitting online for this drain setup.