


wingless
-
Posts
710 -
Joined
-
Last visited
-
Days Won
74
Content Type
Profiles
Forums
Events
Posts posted by wingless
-
-
Welcome to the forum.
Yes, the 153439-00 arbor nut has been discontinued and a replacement fastener w/ the correct diameter, pitch, thread orientation and strength could probably be used if this fastener was lost.
But, the reported issue is stripped threads.
Frequently when mating threads are damaged, both parts are affected.
So, if the nut is damaged, then it is likely that the motor arbor is also damaged.
It may be possible for the correct replacement nut to retain a static blade, but I would not want to be anywhere near that tool when operating and especially when the blade is put under load.
It has reached time when that saw must be relegated to fond memories.
-
Welcome to the forum.
In a case like this vehicle identification may be useful.
My speculation is that the coil is not plugged. That is very easy to determine by disconnection of both heater core hoses, then squirting garden hose water into one and observation of good flow out the other.
My speculation is the most likely issue is an air bubble that needs to be "burped". Many vehicles have a bleed screw on the thermostat housing, to bleed air. That is a great starting point.
The second possibility is that the blend air door isn't routing cabin air over the heater core.
-
My experience is that plug cleaning is a feel good emergency measure, but very limited utility. If the plug is bad toss it.
IMO, the plug lifetime is based on other factors, such as maintaining the air filter as clean. If I am doing dusty mowing and don't clean the air filter, then my plug suffers.
Otherwise, I get years and years from my plug.
On my 1985 Snapper 21" walk behind, I find decreased power means the plug needs replacement.
-
 1
1
-
-
Try reaching out to DeWALT. Maybe they can assist. That should not happen.
-
Welcome to the forum.
The DeWALT D55168 Type 3 parts listing does not show anything at that location.

That appears to be a prior repair that has failed.
There are many online topics showing how to repair a compressor tank pinhole.
While it may work for some period and while it might not have a catastrophic and disastrous failure, the risk associated with that pressurized tank failing is not something I would want to be in my vicinity.
IMO, time to get a different compressor, or at least a different tank.
-
Welcome to the forum.
When using the keyless chuck, toggle the forward / reverse switch to the middle (lock) position.
The middle position permits tightening the chuck completely. Same for loosening.
-
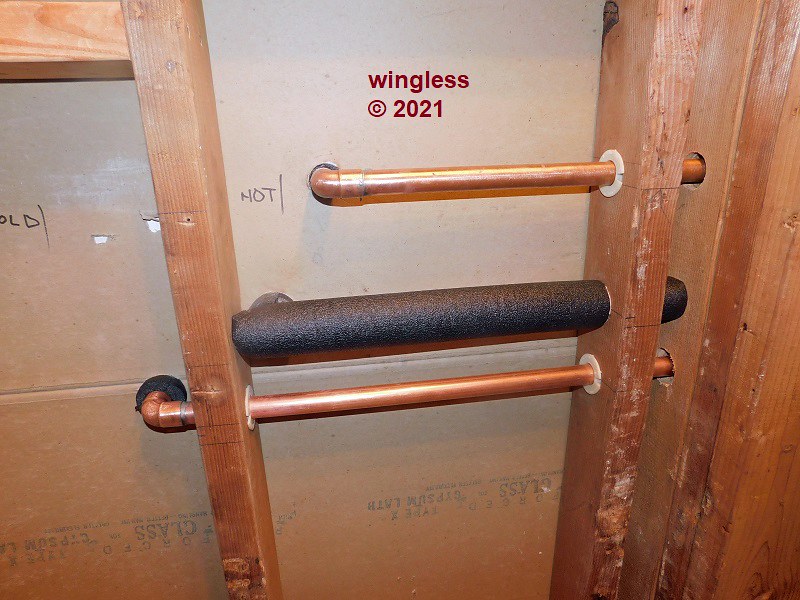
The major remodel of a rental home includes elimination of the 35 gallon water heater and replacing it with a 18kW tankless water heater mounted on an interior closet wall. This change will permit a later update to add an additional bedroom and bathroom.
The 18kW Rinkmo heater I purchased for my southern Florida home appears to be well made and well designed. The usage of a tankless water heater requires proper selection, based on expected water consumption and based on inlet water temperature. The southern Florida application is best / easiest because the cold water never gets really cold. 18kW Tankless Heater
These are some issues I have with the product and the documentation.
The printed and web documentation has zero mention about external valves that may be required or appropriate for the installation. For my installation I incorporated a 3/4” tankless isolation valve kit w/ a 3/4” over pressure / over temperature valve, per the local requirements. Isolation valve
The copper plumbing for the 3/4” safety valve slopes downhill to the exterior of the structure, w/o any valves, w/o any reduction in size, w/o any trap, ending at the specified height above ground, all per the local code.
The tankless heater parts included four sheetrock wall anchors w/ screws for mounting. There was no way I was going to attach using wall anchors. My installation in the closet next to the unfinished bathroom permitted me to add horizontal 2x4 boards between the vertical studs. Those horizontal boards accepted the right side mounting screws and the vertical stud accepted both left side mounting screws. This is a very solid mounting method. This placement permits the plumbing to enter the walls w/o jogs.
The wiring design was a big disappointment. The 18kW heater has a single 3/4” wiring knock out w/ double flats and includes an appropriate cable clamp. My installation within an interior closet led me to not want to place jacketed NM-B cable so it exists within the living space. My solution was to instead use a 3/4” Schedule 40 conduit and 90° elbow. The problem is that 3/4” conduit is too small for four 8 AWG stranded conductors (with two ground wires). The only wiring option is 8/2 NM-B, unless using individual conductors in conduit, like THHN, because there is no 8/4 NB-B wire available.
A much better wiring solution would be to have a rear entry, through the wall. That was not possible for me to implement, if I were inclined to modify this UL-approved enclosure, because the only space available for placement of this hole is obstructed by a horizontal mounting stud. If the wire were permitted to enter from the rear, then there would be no wiring exposure to the living space and no issue w/ the 3/4" conduit being too small.
My two 8/2 NM-B wires are routed to the main exterior panel, run through 1” Schedule 40 electrical conduit, attached to the exterior wall on the side of the house, then into that exterior panel. The 1” conduit size is great for two of the 8/2 NM-B wires.
A pair of 240VAC / 40A THQP240 breakers is used to supply power to the wiring. These are the smaller 240 VAC breakers, using only one panel space, straddling the barrier between phases, instead of the full size THQL breakers where the 240V breaker uses two panel spaces. Note that 1/2 size knock out filler cover panels are required when transitioning to and from THQP and THQL breakers. At least two fillers are required to properly close the dead front panel when using any of the smaller THQP240 breakers. For safety never leave any openings in the dead front panel.
The tankless water heater has a small internal “paddle wheel” to detect water flow. The device includes a screen to filter crud from clogging that flow sensor. My solution was instead to place a cartridge filter in the cold water plumbing supplying the tankless heater. If that wheel ever clogs, then no hot water. Water Filter
The valve kit I used permits periodic usage of a tankless water heater cleaning kit, to run vinegar through the tankless heater, to remove scale. There is zero mention of cleaning in the tankless manual or the web page.
My “old school” installation uses 3/4” Type L copper pipe. I run the pipe to within the wall as soon as possible for proper routing / spacing. The hot pipe is insulated w/ snap on foam pipe insulation. The insulation is used to maintain whatever margin exists for making enough hot water. The safety valve output points directly into the wall making that part very clean.


 [/img]

-
2
-
-
An air compressor tank is designed to remain pressurized 24/7/365.
The best method for control of water condensed from air water vapor is to install an automatic tank drain purge valve, that burps air / water out from a bottom bung to a drain location.
Every air compressor already includes an unloader / check valve, that automatically purges the pressurized air between the tank and the compressor, so the compressor is free to start against atmospheric pressure, instead of struggling to start against a pressurized tank. That is the audible hiss after the compressor stops.
-
2
-
-
Welcome to the forum.
Demolition waste is a big part of any remodeling project.
When my daughter and I initiated a home remodel, we ended up w/ a massive amount of heavy mass rubble, including LOTS of tile, sheetrock and much other assorted debris.
In southern FL, all of the municipalities prohibit discarding construction debris. A barrel full of tile would have greatly exceeded the hydraulic lift ability for my home Brute 50 gallon barrel and would have raised bright red flags for the municipal trash authorities.
The local pay waste collection services charge by the pound, plus will reject collection if the mass exceeds limits. They will also charge for a rejected collection.
My solution was to meter out the debris to the local municipal collection over many weeks until my pile was gone.
The disposal of rubble should start w/ examination of the local pickup rules to determine what is permitted / prohibited. My wife uses local chat forums. That type of communication may provide insight of how others in your area addressed that issue.
-
2
-
-
Welcome to the forum.
Thank you for sharing Hilaria Baldwin w/ the United States.
What about the DeWALT DCK299M2 / DCD996 hammer drill? That tool appears to be very similar, except without including the POWER DETECT 8Ah high capacity technology.
-
11 hours ago, Kevy said:
Had this happen to me on both batteries wouldn't be the 2 amp ones would it
Welcome to the forum.
Note it is never good practice to resurrect an ancient thread.
It is much better form to create a new topic to detail any issues and members will assist.
-
1
-
-
Welcome to the forum.
A 240V / 15A motor is going to be about 3½ horsepower or greater, depending upon motor-specific parameters.
The 12" saw w/ ~3½hp is going to be better that a 10" saw w/ 1hp, assuming both are working properly.
Agree that it would be disappointing to wire for the saw only to discover it is dead.
An "easy" way to test is to use the electric dryer connection and change the receptacle to permit a quick test w/o a huge effort and commitment.
FWIW, all my table saws have been 10". My guess is the 12" is better, but possibly higher costs for things like blades and accessories.
-
Welcome to the forum.
That is unfortunate.
Why not carefully repair the damage using epoxy?
My go-to product is West System epoxy. I also use their fillers to thicken and change the properties, as required.
-
Welcome to the forum.
The #31 slides up and down in the #55 when the #58 shaft is rotated, using the control not shown in the image having a gear that mates to the #61 gear.
If the parts don't move then cleaning and lubrication is a good first step. Parts that slide and parts that rotate must slide/rotate instead of binding.
The #31 slides up and down on the #56 shafts. The #58 shaft screws into the #60 receptacle.
Also, the actuation shaft and shaft bushings not shown in the image must be free to rotate.
It may be that the #30 set screw has loosened, permitting the #60 receptacle to move w/o also moving the #31 frame. If that is the case, first turn the adjustment so the #60 is fully bottomed into the #31, then tighten #30. (Note: don't use Hurculean force to overtighten set screw and partially crush the receptacle.)
-
1
-
-
Welcome to the forum.
That is a nice looking saw.
The audible sound from my direct drive table saws has always been very screeching loud, while my belt drive is very quiet. I have never owned or heard a worm drive. How is the sound?
A table saw is one of the most useful general purpose tools. The concern for safety is very, very valid. Bad things can happen so much faster than the eye can see or a human can react.
There is LOTS and LOTS of info available online. That is a great newbie starting point.
Here are some general pointers:
- always be aware of the location of your fingers and the blade
- only use one, a rip fence or a miter slide
- never free hand cut
- always use a riving knife, purchase or fabricate a modified riving knife (if required) for non through cuts
- sleds are very handy tools to increase safety and accuracy
- plan the entire cut, especially important on larger material
- the usage of push sticks and push blocks is important when appropriate
- be aware of potential binding conditions, like cross cutting (miter) or ripping (rip fence) on long pieces where control of the angle to the blade is more difficult
- always wear eye protection, no loose clothing or jewelry, well lit work area w/o clutter, stable saw setup location
There are many more safety / usage pointers.
My workshop saw is an amazing tool. I also have a direct drive saw w/ stand that I use for remote work.
-
1
-
On 1/10/2020 at 12:44 PM, wingless said:
Welcome to the forum.
That is a scary event. Hopefully your recovery is progressing.
There are no issues related to that problem on the DeWALT Safety Notices and Recalls web page.According to the MSDS the conditions to avoid are: "Avoid exposure to elevated temperatures and fire."
Nothing else was located on-line about that problem.
Note that Lithium Ion batteries have high energy density and all appropriate handling procedures must be followed.
1 hour ago, Kyle said:Hello,
We had this exact this happen this morning in our garage around 9am, 12/24/2020, (merry Christmas eve to us). It was the exact model of impact driver you were using.
This needs further looking into at dewalt. I will be contact them. I luckily did not lose anything incredibly valuable, and nobody was injured.
Welcome to the forum.
There are still zero FlexVolt safety issues issues being reported on the DeWALT site or on the CPSC site.
My suggestion is to report the details both to the manufacturer and to the CPSC, instead of only to a forum, so appropriate action may be implemented.
There is a reason why the Owner's Manual has four pages of battery and battery charger safety instructions (that everyone fails to read).Lithium Ion batteries have a very high energy density and all safety procedures must be followed.
-
2
-
-
Welcome to the forum.
This style picture hook is available in many small to large sizes and is the only method I use for hanging pictures.
It works well, in my case has never failed in decades of usage and many dozens of applications.
It leaves a very small hole in the sheetrock and is very easy to fix w/ joint compound.
-
1
-
-
This reply has a decent air compressor tank cleaning / finishing process.
-
Welcome to the forum.
Automatic in what way?
-
1
-
-
3 hours ago, James kelly said:
bought Bosch 11335k Jack Hammer. wanted to buy that for a while
Welcome to the forum.
Wow, now you need to find something that needs demolishing.
[

-
Welcome to the forum.
My experience when vacuum sanding / polishing with pads and paper to that level w/ my Festool RO 150 FEQ is that I have seen nothing to indicate that adhesive backed would work better than their quick fix abrasives.
-
1
-
-
4 hours ago, nailer said:
Thank's @wingless, For your help. It's working now...
Great mews. Thanks for the update.
-
Welcome to the forum.
This topic shows my Super Sawzall switch replacement. The images show the disassembly of the failed switch.
It might be possible to disassemble / resurrect the failed switch on the OP's tool.
-
1
-
-
Welcome to the forum.
Not clear from the reply what problem exists, as it appears that the toilet always flushes, or does "rises a little, and leaves" mean w/o flushing the bowl?
If the drain is proper and unobstructed, as indicated by the bucket dump into the bowl test, then everything is pointing to the toilet. Even the manual flapper pull test is pointing to a poor toilet.
Has the toilet always been problematic or is this new?
All that being said, yes a different toilet will have different flush characteristic. All the new toilets save water. Many have dual mode flushes, for solid or liquid removal. The wife prefers the tall toilets.
-
2
-

fix broken pres wash
in Outdoor Power Equipment
Posted
You know it is a WATER pressure washer, not an AIR pressure washer...
Unknown if proper operation may be restored by a pump rebuild.
A disassembly for internal inspection should reveal the condition.
That pressure washer looks decent, so repair should be considered.