


wingless
-
Posts
710 -
Joined
-
Last visited
-
Days Won
74
Content Type
Profiles
Forums
Events
Posts posted by wingless
-
-
Welcome to the forum.
If going w/ Festool, I use their long life bag, then dump / shake out over and over, until the bad fails.
-
Welcome to the forum.
+1 on safety first.
The nature of grinding includes glowing metal sparks.
My observations of those operations are that most of the debris goes in the path tangent to the contact point.
However many embers remain on the wheel surface only to detach at some other point.
The maximum safety will be realized by performing the grinding in an area w/o sawdust, regardless of collection apparatus.
-
Welcome to the forum.
Thanks for the info.
Yes, the combo kit is a much better value. I have purchased those an sold parts that are extra for me and was ahead of the game.
-
Oh, you're talking about above ground garden hose sprinklers. Mine are in ground.
There is an upright tripod sprinkler I used for spot application, when required.
The in-ground irrigation provides a better solution.
-
You're welcome.
The Hunter Residential Sprinkler Catalog shows different grade parts available for each application. When I looked last the higher grade parts were available online. I don't know how these rate to parts from other brands.
My large lawn brought me to expert level on sprinkler replacement. I would lay a plastic tarp (an empty 3 cubic foot peat moss bag) near the broken head. Use my flat shovel to cut a box shape through the lawn. Lift the lawn square onto the plastic. Put some more dirt onto the bag. Remove, replace and adjust the head. Replace the dirt and lawn. Done. I got pretty fast at this repair.
FWIW, massive peat moss applications twice a year enabled me to get my $1M lawn.


-
They are available at places selling power tools.
Is the inquiry about which one to select?
-
My last home had well over 100 sprinkler heads.
The original ones worked and worked and worked.
The new ones would only last for several years before failure. I was replacing the new ones over and over again.
The major manufacturers have different grade parts, but I always just got the parts from the big home improvement store shelves. Those higher grade parts are available online.
It seems reasonable that the higher grade parts would last longer before failure.
-
Welcome to the forum.
Wear eye protection.
Select the correct size six point socket, in either ½" drive or 3/4" drive, use a 3" extension and a 18" to 24" breaker bar. Slide a 3' pipe over the breaker bar.
Use an aerosol lubricant on the lug nuts for several days before attempting to move the nuts.
When first attempting to break free, turn nuts TIGHTER, until they budge, then stop. Work nuts back and forth, with greater rotation in the loosen direction, then back to just snug tight. Continue on the back and forth until the nuts are free.
Use LOTS of aerosol lubricant throughout the process.
My favorite lug stud lubricant, prior to assembly, is Anti Seize. I then always ONLY use a torque wrench at the lowest end of the specified foot pound torque range.
-
Welcome to the forum.
http://cms.toolpartspro.com/image/919-16560-Type-0/919-16560-Devilbiss-T0-PB.pdf
http://documents.dewalt.com/documents/English/Instruction Manual/Devilbiss/919.165600 P.pdf
It sounds like the valve plate is not working properly.
-
Welcome to the forum.
Wow, if so then that could be the handle that Old Charlie stole in Locomotive Breath, probably worth something.
-
Welcome to the forum.
My Festool RO150FEQ has been used waaay more hours of continuous usage than I dare to count.
As you should be aware, proper operation with this tool is the pad flat on the surface (not tipped), with regular pushing force (not excessive) and the force normal (perpendicular) to the surface, pushing on the back pad.
As was stated, a vacuum is REQUIRED when using this tool. It serves many benefits. One is the obvious, dust removal. It also keeps the media (sandpaper) from clogging. It also helps extend the media life. It also keeps the tool cooler.
If the media is clogged then it might cause the tool to hop around. If the pad is past the service life then this might affect operation.

-
It looks like this DeWALT DXST10000 four shelf unit, w/ one laminate shelf and three wire shelves.
Very nice unit. It will outlast you and I put together...
https://dewaltshelving.com/xl-steel-industrial-storage-rack#
-
They look durable.
One possible upgrade would be to bolt plywood across the grating.
That would make sliding easier, prevent small stuff from falling through and improve dent resistance.
Mine are steel panels w/ tee-shaped corner posts, flat diagonal slats, all retained with bolts. I have seven bays of shelves.
Mine are marked with the shelf and diagonal locations for ease when moving. Mine have placement limitations due to the design, bolts being shared for adjacent shelves, plus a bolt used for a shelf isn't available for a diagonal. But mine are also very heavy duty.
-
Nice shelves.
Don't climb (or let children climb) on the shelves and the anti tip bracket won't be required.
My tools are stored on some industrial steel shelves I purchased decades ago and they work great.
-
This week the Uber driver dropping off the tenants at my AirBnB rental flattened my mailbox, breaking the post and crumpling the metal. Of course he didn’t stop to report the damage.
Fortunately, I have cameras recording exterior activity and captured the incident. After much searching, I discovered how to file a claim and it looks like I will be paid for the damage.
From a practical perspective, I selected a one-piece plastic mailbox that slides over a post, done. No rust, no painting, easy installation, lasts forever, sounded good to me. My daughter looked at that choice and instructed me to NEVER AGAIN ask for that mailbox.
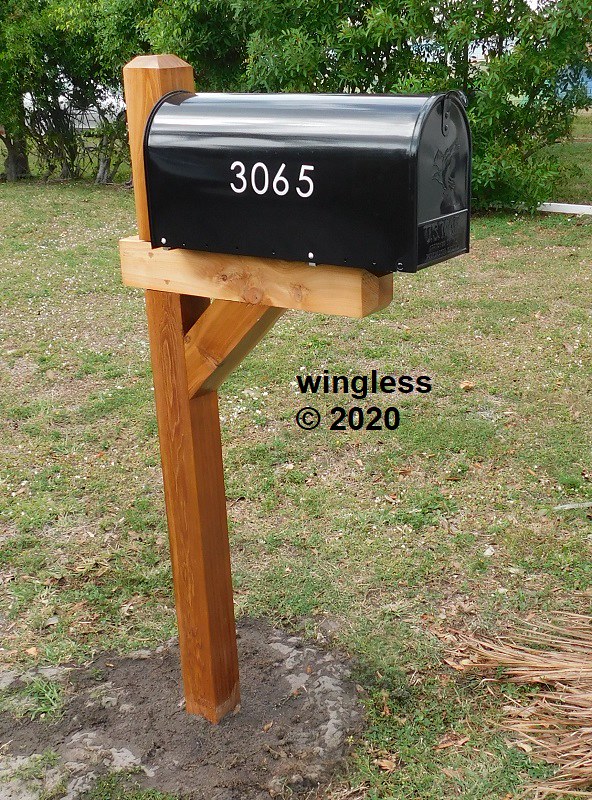
She instead has a good eye for style and design. She selected this Gibraltar Elite E1600B000 Large Black Galvanized Steel Mailbox, this Universal Forest Products 7405 Cedar Mailbox Post and these Diggoo 2” 0-9 Reflective Numbers. I also used this Gibraltar Mailbox Steel Mounting Bracket, plus two 50 lbs. bags of Quikrete 1004 Fast-Setting Concrete Mix.
The cedar mailbox post assembly is rough cut wood w/ raised grain. I used my Festool RO150FEQ Rotex Vacuum Sander to quickly make the exterior smooth. The recessed nail holes on the angled support and cross-halving joint were filled w/ DAP Plastic Wood all-purpose wood filler and then sanded smooth.
The vertical post and horizontal arm have a cross-halving joint. There is also an angled support nailed to the post and arm. My mailbox post assembly was nice and solid, even though some of the cross-halving joints had ~ ¼” gap.
The wood was protected w/ three coats of Minwax Pro Series Spar Urethane. This is a high-gloss water-based finish that protects against water and sunlight. I sanded w/ 220 grit between each coat and used a tack cloth for dust control.
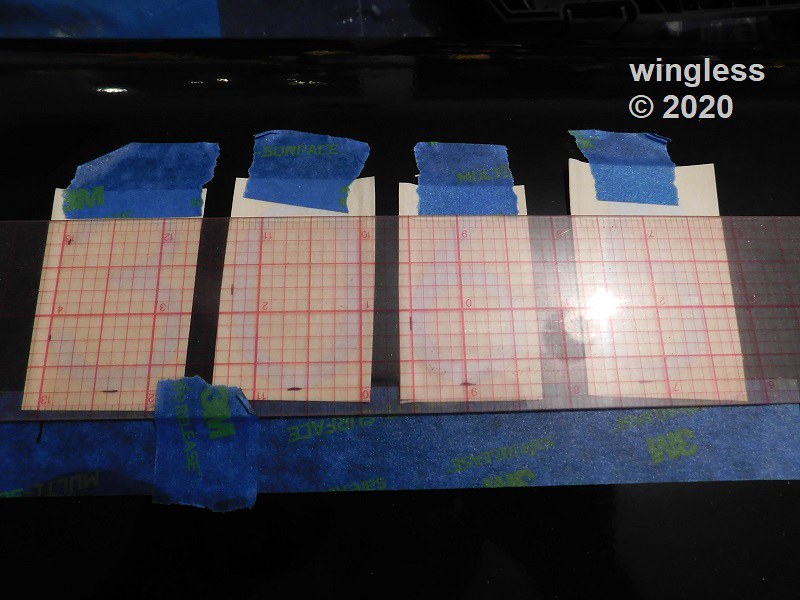
The reflective decal numbers were applied using the standard tape hinge method, to ensure proper registration before committing to the placement. The “hard” thing on the number placement was not being a block letter format, w/ lots of slanting to the right, requiring visual inspection and slight tweaking to get good placement.
A fine Sharpie was used to mark the left and the bottom edges on the top paper to aid placement visibility. A clear grid ruler was also used for placement. The spacing was set at 1-3/4”, left edge to left edge.
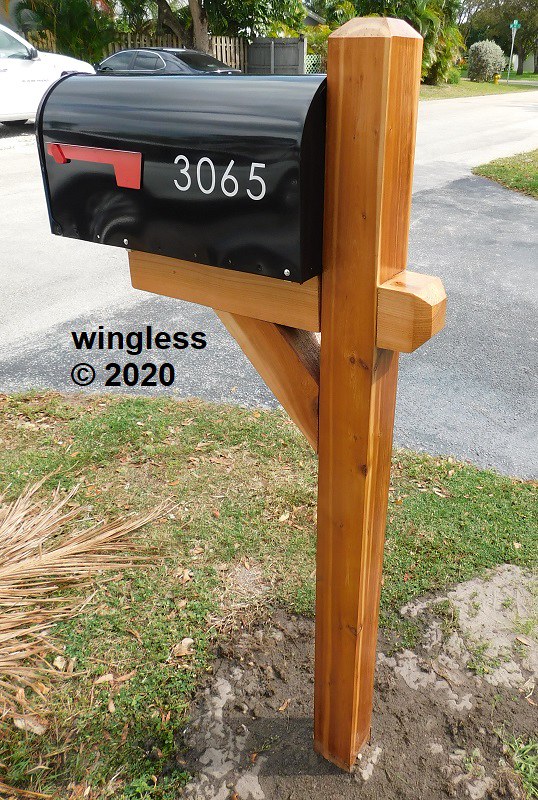
The mounting brackets worked okay, just a little tedious. Install brackets onto mailbox, put mailbox onto post arm, mark bracket location on post arm, remove brackets from mailbox, mount brackets onto post arm, attach mailbox to brackets. I also drilled a hole high on the rear mailbox surface and screwed the mailbox to the vertical post for extra stability. The brackets worked fine w/ my mailbox, w/ holes at appropriate positions, so no extra drilling required.
The old broken post was removed from the sandy southern Florida soil. The old post already had a large buried concrete “donut”. The once-monthly city bulk pick-up arrived the next day and removed the broken mailbox using the claw arm. The hole depth was tweaked to get the USPS-specified 41-45” arm height.
The installation is “easy”, place the post, pour in dry concrete, adjust post to vertical, pour water onto ground, allow to harden.
This AirBnB mailbox should not get mail. All the “real” mail has a permanent transfer to my house, so it is just the junk mail. The old mailbox had crime scene tape covering the opening, behind the door. For this one I cut a Styrofoam plug to obstruct the opening and added a “Nothing Into Mailbox” label to reinforce not placing junk mail into the mailbox. The pedestrian mailman did a triple take at my foam plug / No Mail sign after opening the door and then not depositing junk mail.
This street gets a dozen cars per day. Hopefully they will miss hitting my new mailbox.


-
On 2/11/2020 at 1:01 PM, wingless said:
My front door light was above the awning, making it useless for illuminating the entry. When I removed my front door to replace the deteriorated frame I also decided to relocate the light fixture to below the awning. It was also REALLY handy when installing the ten ½' x 6" Tapcon bolts retaining my 3½" x 9" x 8' pressure treated beam to my concrete house, when I replaced the door frame bucks.

The shims were trimmed w/ my OMT. The gaps above and below the shims were packed in with mortar. All the perimeter gaps were packed solid with mortar.
The frame bucks were covered with wire lath, mortar, then stucco. The house will be painted this week.

-
 2
2
-
-
Welcome to the forum.
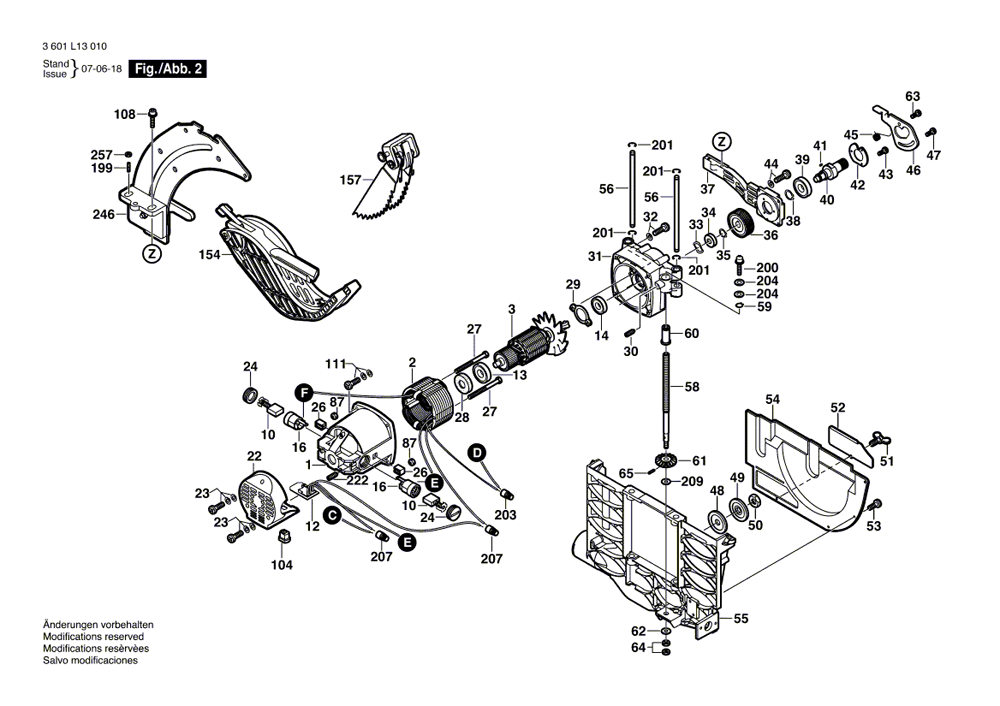
What is it? What tool uses that part?
-
Welcome to the forum.
There is one available on eBay. That knife looks thicker than mine. If it doesn't fit into this pocket, then that could be shimmed to accept the thicker part, if required.
The riving knife and blade guard are not available otherwise.
https://www.ebay.com/itm/283422623625?ssPageName=STRK:MESELX:IT&_trksid=p3984.m1555.l2649
Good luck with your saw. Please post images.
This is a great tool.
-
Welcome to the forum.
Here is the parts diagram for your saw,
https://media.toolpartspro.com/image/DW746/DW746-Dewalt-PB.pdf
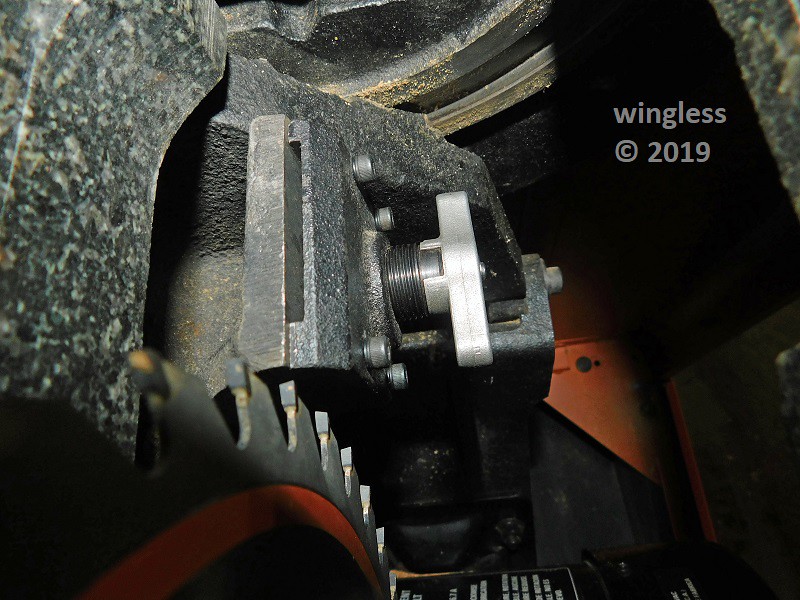
It looks like gravity and the motor mass provide the belt tension.
If correct, then inverting the saw will have a loud clunk (from the motor swinging until it hits something) plus releasing the belt tension, making exchange "easy". Be careful, use two people, the saw is heavy, about 200 lbs.
Here is the Owner's Manual. It does not cover belt replacement.
file:///C:/Users/wingl/Downloads/652612-00,DW746.pdf
Please inspect and report.
-
Welcome to the forum.
Small portable compressors are typically not quiet.
The compressors that control noise best are the Quiet Rotary Screw (QRS) compressors, like this one. The QRS compressors are also larger and more expensive.
https://www.northerntool.com/shop/tools/product_200338695_200338695
The Glaston link does not reveal specific models to my searching on their web site.
-
2
-
-
Welcome to the forum.
Has the tool been lubricated as-defined in the owner's manual?
https://www.boschtools.com/us/en/ocsmedia/2610048783_1117_4100.pdf
If the shafts / gears / wheel is turning, but no up / down, then I would clean / lube the two #56 shafts, the #58 and #60 drive as a starting point.
-
Charlie,
Always glad to help.
Active members will see your reply / inquiry and will jump in if they can assist.
Good luck.
-
1
-
-
On 1/2/2020 at 6:12 PM, wingless said:
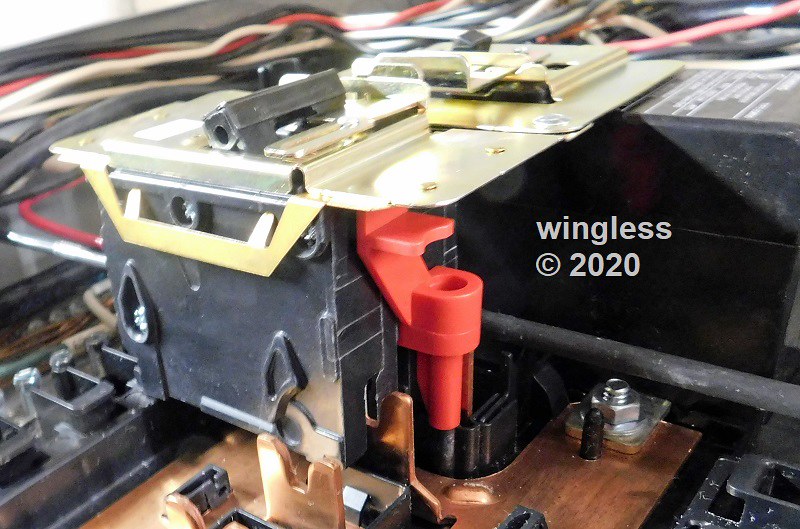
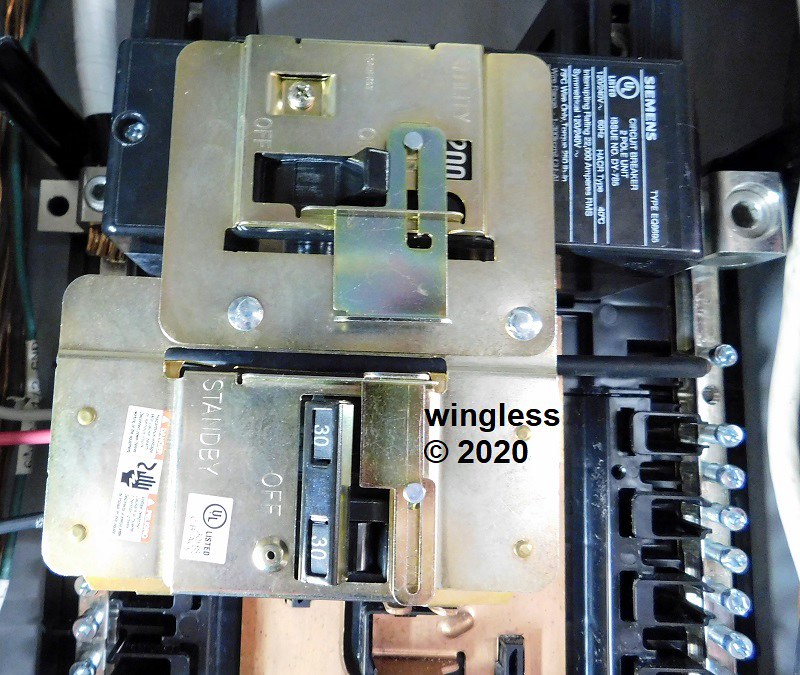
Another factor driving this panel selection was the ease to safely implement a generator standby interlock. Simply select the correct ampere rating on a Siemens QP two pole circuit breaker, locate at the top left positions, leave the two top right positions empty (no breakers) and use these parts. Use a Siemens ECSBPK03 generator standby power mechanical interlock and a Siemens ECMBR2 main breaker hold down kit, used to create a secure main, for a safe generator connection. For my 5,500 Watt portable Troy-Bilt generator I used this Reliance Controls Corporation NEMA L14-30 PB30 30-Amp NEMA 3R power inlet box with 10/3 (four conductor) wiring to that exterior wall box. There are different boxes available, such as for a 50A generator, but I didn’t need that larger size.
One thing to note on these generator interlock parts is that removal is difficult, due to the snap retention tangs, so only install these parts when everything else is completed.
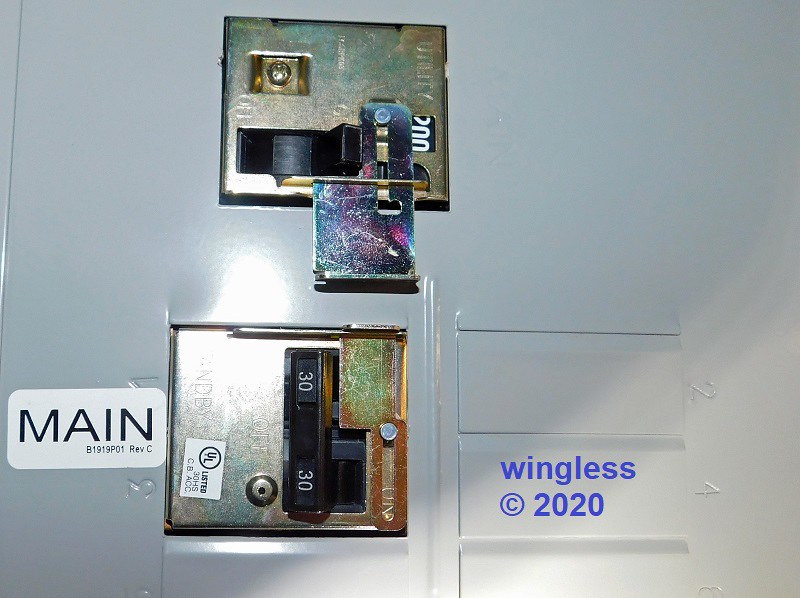
This Siemens load center has 40 circuit breaker positions, good for up to 80 circuits. Four are consumed when properly using the interlock for a generator transfer switch. Some modify the interlock parts, to NOT lose the two top right spots, but that is unsafe and that does not permit the required placement of the hold down kit for a secure main.
The generator wiring has been completed.
There is now an exterior power inlet box where I may connect my portable generator.
The main panel has a mechanical interlock for safety and for compliance. The generator breaker is mechanically secured, for the same reasons, to create a secure main.
The hold down kit includes a black molded electrical screw insulation cover. This does not remain in-place on my 30A Q230 Type QP double pole breaker, to not fall off when not held by my fingers. According to the Amazon Siemens ECMBR2 hold down kit listing, this is compatible w/ breakers 60A or larger. A telephone discussion w/ Siemens revealed that the 60A and larger breakers have a hook that grabs the cover tang for retention. The smaller amperage breakers don't have that hook. Mine will not have that screw cover installed.
The mechanical interlock must be installed last because the retention tangs will make removal difficult.
The ONLY way to remove / replace the panel cover is with BOTH the main breaker and the generator breaker in the OFF positions. The interlock has a detent to hold the lever up during the panel cover installation / removal process.
Now the interlock permits either street power or generator power to feed the circuit panel. It is also impossible to back feed the exposed exterior power inlet box electrical prongs. The interlock makes it impossible to connect the generator output to street electricity.


-
Welcome to the forum.
That setup is very common.
The tool does not require LOTS of grease. Clean up the excess and give it a couple of squirts a few times a year.

Craftsman Sander/Grinder - accessory wanted
in Accessories
Posted
Welcome to the forum.
Doesn't the tool already look like this image w/ tables and a disc?